Quantcast
Channel: blog.atwork.at
Viewing all 1153 articles
Browse latest View live

Delegate365 changelog version 8.3-Sync with Group

$
0
0

With Delegate365 v8.3 there comes a new feature in the Sync Rules: Sync with security group allows to automatically remove users from an OU. See how this works here.

This is a feature request brought to us by Delegate365 customers: When a user is removed from a security group, he or she should also automatically be removed from the corresponding OU, if the User sync rules are set to "Security group". So here´s a description of that feature with a sample (improved Delegate365 Admins can have a look at step1 and then continue with step 7)…

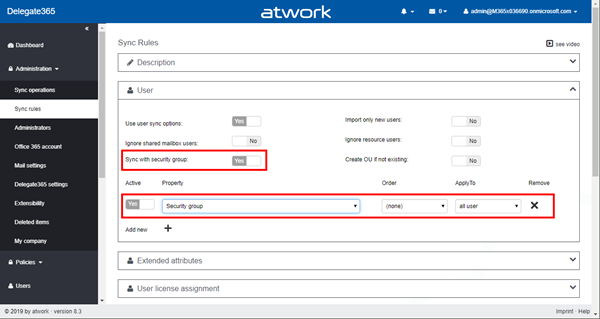
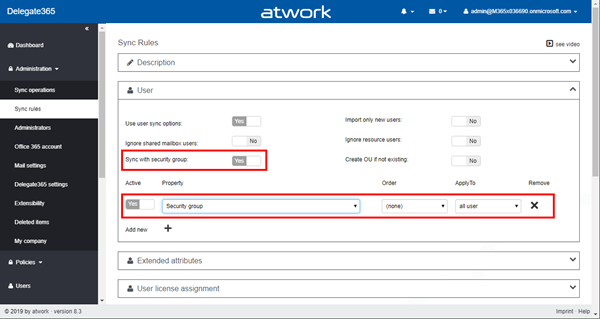
  1. In Delegate365, the User sync rules are activated, and there´s an active rule set to "Security group". With this version, there´s a new switch "Sync with security group" that needs to be set to Yes as shown here. This activated switch will remove users from an OU if they are no longer member of a security group.
    image
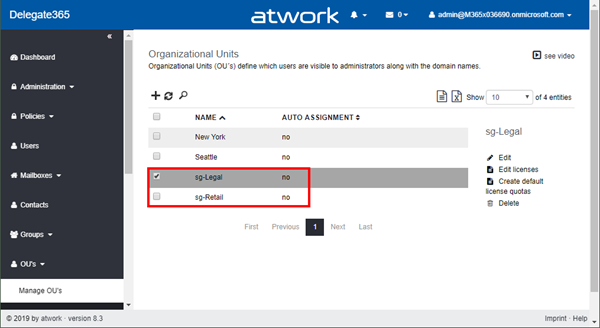
  2. In our scenario, I want that all members of Security Groups sg-Legal and sg-Retail shall be assigned to the OU´s with the same name. So, I created these two OU´s manually, additional to the two existing OU´s New York and Seattle as in the following screenshot. (My user has these OU´s assigned to see all objects in Delegate365.)
    image
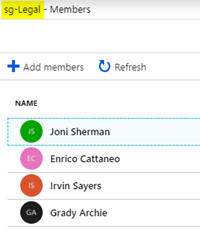
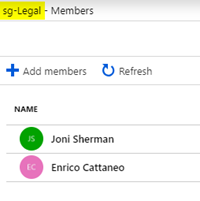
  3. To test, I have added 4 persons as members to sg-Legal: Joni, Enrico, Irvin and Grady. I did this outside of Delegate365 in the Azure portal, to test the consequences like in an hybrid environment.
    image
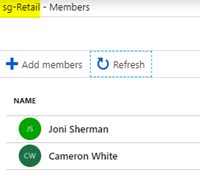
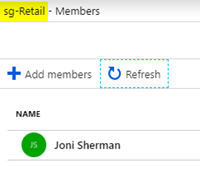
    The second group sg-Retail, has only 2 members: Joni and Cameron.
    image

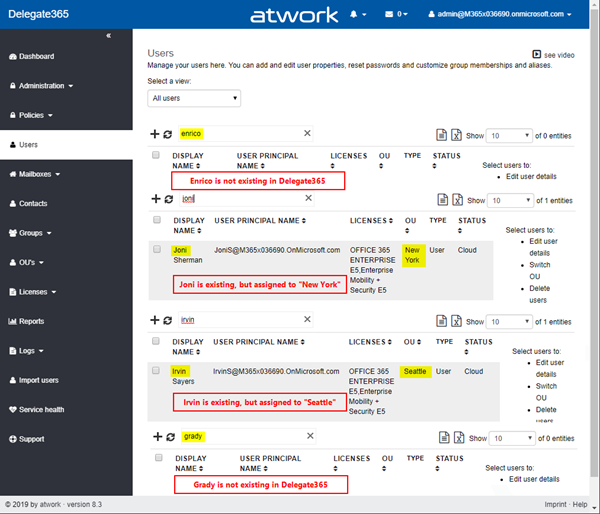
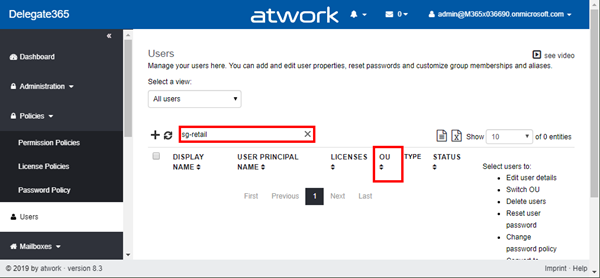
  4. Check before sync: Currently, as administrator, I don´t see these users in Delegate365 – or some of them assigned to another OU: Enrico, Grady and Cameron are not showing (they are not assigned to an OU), Joni is already assigned to New York, and Irvin is already assigned to Seattle. This is the start scenario, composed in one picture with the Users search.
    image
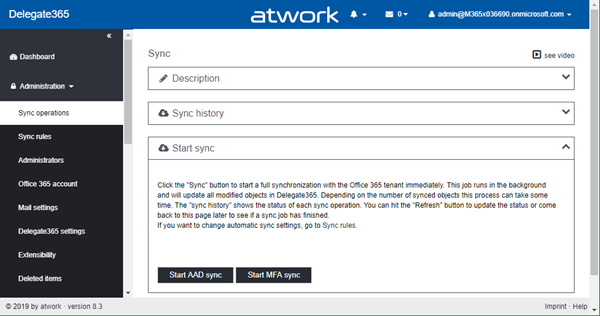
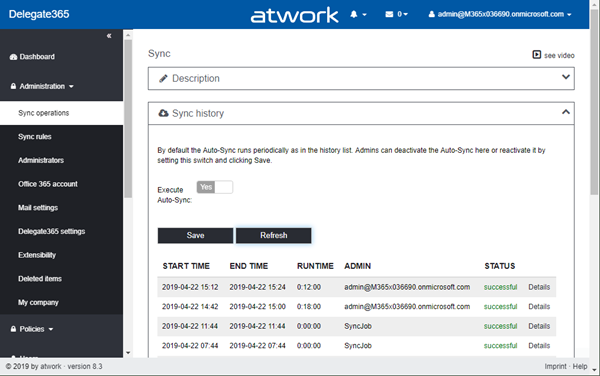
  5. Let´s run the sync in Administration / Sync operations by clicking on the Start AAD sync button. Confirm the execution.
    image
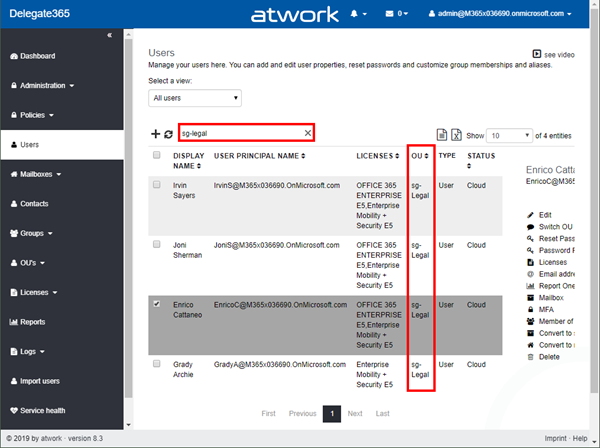
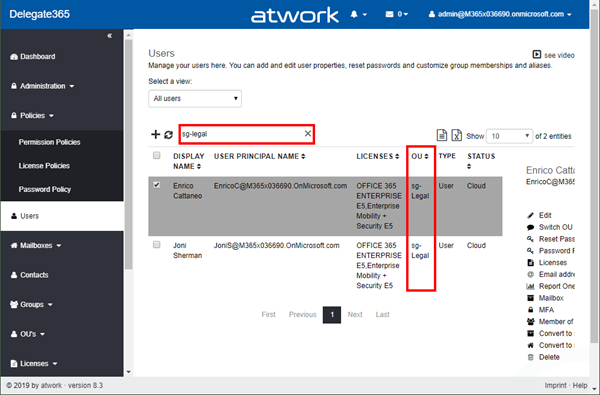
  6. When the sync is completed, let´s see the result in the Users list. When filtering for OU sg-Legal, we see the 4 group members (Joni, Enrico, Irvin and Grady) assigned to that OU.
    image
    Important:
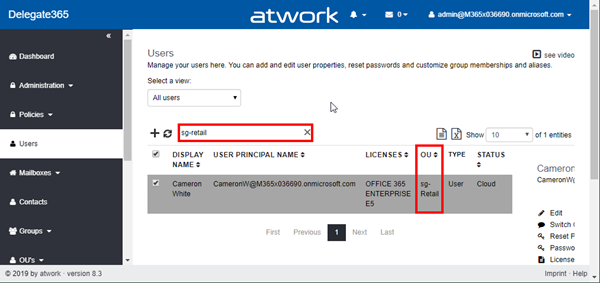
    Oh, a word to our second group sg-Retail with the 2 members: Joni and Cameron. As we see, Joni is also member of group sg-Legal. In Delegate365, an object can be assigned to an OU only. So, the first group "grabs" Joni and assigns her to sg-Legal. When checking for OU sg-Retail, we see just Cameron (and no Joni, because she was assigned to sg-Legal).
    image
    So, one object = one OU assignment in Delegate365. All clear?
  7. So far so good, there´s no news until here. Now, let´s remove members from the two security groups. The members of sg-Legal have been changed to Joni and Enrico only, Irvin and Grady have been removed.
    image
    And do the same for sg-Retail: We removed Cameron, and now only Joni is in.
    image
  8. Run the sync again (as in step 5).
    image
  9. With the new sync settings, we get these assignments: sg-Legal now contains only Enrico and Joni. Irvin and Grady have been removed – the OU has the same members as the Security Group.
    image
    The second OU sg-Retail is empty as expected: Only Joni is member of that Security Group. But Joni has been assigned to sg-Legal already, and Cameron has been removed from that group. So we see an empty OU as here.
    image
  10. As we can see, with the switch "Sync with security group", the OU´s now run synchronously with the Security Groups. Just, as exaptation, users can be assigned in Delegate365 only once.

We hope this new sync feature helps improving your users organization based on security group memberships in Delegate365!


Microsoft 365 Fragen und Antworten bei atwork´s kostenloser Security Sprechstunde

$
0
0

Microsoft und atwork laden zur Remote Teilnahme an unserer Security Sprechstunde ein! Dies ist ein Event, welches mehrmals von Frühling bis Sommer 2019 von Microsoft Österreich und atwork kostenlos angeboten wird. Teilnehmer erfahren die neueste Informationen und Praxistipps rund um Microsoft 365 und können Fragen an die Experten stellen. Hier geht es zu den Terminen!

image

Unter dem Motto "Don´t be afraid. Ask the expert!" informieren unsere Microsoft 365 Expertin Martina Grom (atwork CEO, Microsoft RD und MVP) und Klaus Harrer-Nemecek (Security Technical Specialist Microsoft) in je einer Stunde über unternehmensrelevante Themen. Hier findet ihr die Sprechstunden-Termine und den Anmeldungslink zur Teilnahme:

Die Anmeldung erfolgt per Eventbrite und durch Angabe der eigenen E-Mail Adresse. Zum Termin dann einfach mit dem Teilnahmelink via Teams einsteigen und mitmachen, wahlweise per Video, Audio und Chat! Die Events werden aufgezeichnet und stehen den Teilnehmern danach zur Verfügung. Nutzt dieses kostenlose Angebot für brennende Office 365 Fragen und Antworten!

Viel Spaß!

Groups Governance Toolkit-Working with group policies

$
0
0

At Microsoft Ignite conference last September, we demoed an approach for a self-built Office 365 Groups Governance Toolkit. Since Microsoft 365 is an evergreen service and continues to evolve, today we have more group settings available and we extend our provisioning function to work with group naming policies as well. See here how this can be accomplished by including new Graph requests.

Foreword

You can find the previous articles of our governance story at Provisioning an Office 365 group with an approval flow and Azure functions-part 1, part 2, part 3, part 4, part 5 and part 6 and the source code at martinagrom/Ignite2018GroupsGovernanceToolkit.

While we have new features in Microsoft Graph which we will show here, another important aspect is that Azure Functions v2.0 are GA´ed since Ignite and the experimental Functions v1.0 will be discontinued in near future. Microsoft has not officially announced a specific date, but they recommend to switch to v2.0, and PowerShell support was (and still is) always "experimental" in v1.0. Azure Functions v2.0 run in containers and work with the .NET Standard library, so they will support PowerShell 5.x and PowerShell 6.x only (PS 6.x can run on Linux, macOS, and Windows). Anyway, we continued to extend our existing Azure Functions in v1.0 and we will update all scripts in the public GitHub repository in near future as well. Also, the functionality will be available as an SaaS product soon.

Setup Group classification and more settings

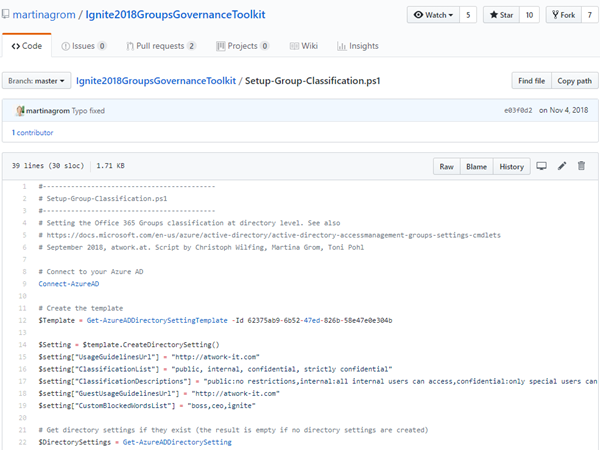
To create or modify the Office 365 tenant´s group settings, you can use the following script at Setup-Group-Classification.ps1.

image

When setting a PrefixSuffixNamingRequirement in the tenant settings, all groups must follow that rule. For example, if this setting is set to "Team.[GroupName]_[Department]", and a user creates a new Office 365 group "NewHires", the name must match "Team.NewHires_HR", if the user´s department is set to "HR". With that simple mechanism, consistent group names within the tenant are enforced. Also more group properties are available as described below.

Use the Microsoft Graph for group settings

Now, this functionality is also present in the Microsoft Graph v1.0 which allows to use these settings in other programming languages as well – thanks to Mikael Svenson for the hint! So, let´s open aka.ms/ge– the Graph Explorer playground tool – and test the new methods.

Tip: To get or set group settings and group data, the authenticated users needs to have the Group.ReadWrite.All and the Directory.ReadWrite.All Administrator permission, otherwise you get a Failure - Status Code 401, Unauthorized response. Graph Explorer informs if insufficient permissions are existing and asks for adding the required permissions and to reauthenticate with the new consent then.

Get the group lifecycle policy

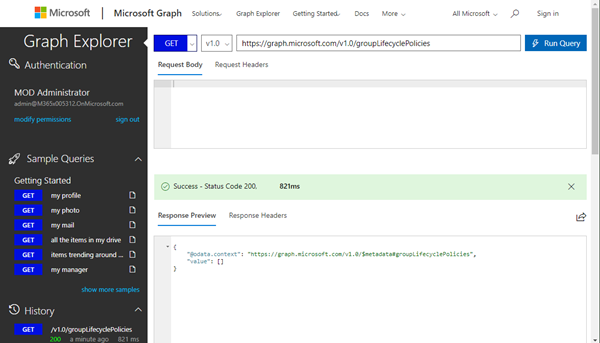
So, the first request delivers existing policies with a HTTP GET against groupLifecyclePolicies. If there´s no group expiration defined, we get an empty value array as here.

https://graph.microsoft.com/v1.0/groupLifecyclePolicies

image

So let´s have a look how to set group settings.

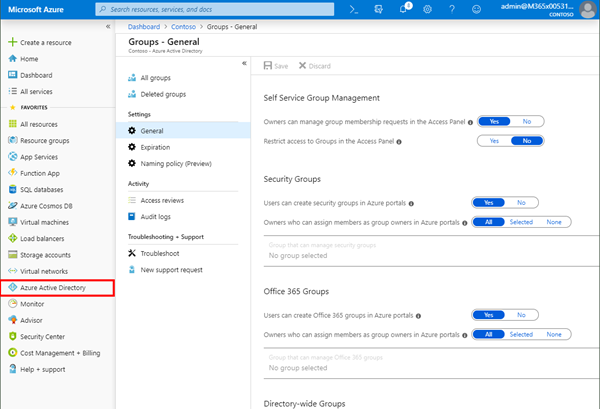
Set general group settings in the Azure portal

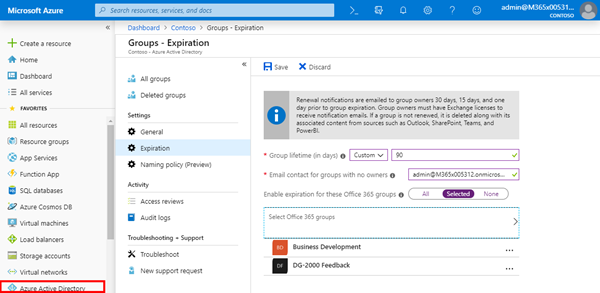
Administrators can modify the group expiration in the Azure Portal, or with PowerShell or with Graph.

image

Set the group lifecycle policy

The Group expiration settings can also be defined in the Azure portal, or with PowerShell.

image

When running the query again, we see the new group expiration settings. In our sample, the settings look as here.

{
     "@odata.context": "https://graph.microsoft.com/v1.0/$metadata#groupLifecyclePolicies",
     "value": [
         {
             "id": "533f29a2-918b-4e43-9d03-759d9e352887",
             "groupLifetimeInDays": 90,
             "managedGroupTypes": "Selected",
             "alternateNotificationEmails": "admin@sometenant.onmicrosoft.com"
         }
     ]
}

Modify the group expiration with Graph

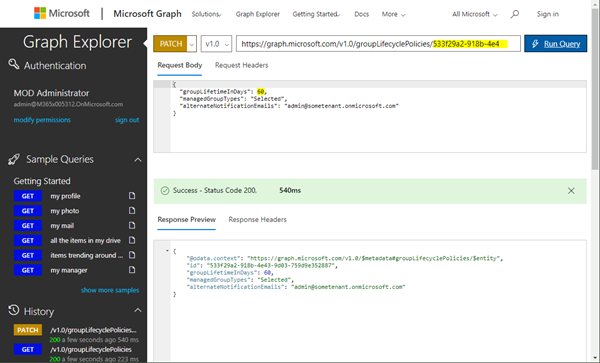
Now we can change values, as setting the expiration time from 90 to 60 days with Graph Explorer. The HTTP request is now a PATCH operation and the settings id is added to the URL and the Request Body holds the data we send to the API as here.

https://graph.microsoft.com/v1.0/groupLifecyclePolicies/533f29a2-918b-4e43-9d03-759d9e352887
{
   "groupLifetimeInDays": 60,
   "managedGroupTypes": "Selected",
   "alternateNotificationEmails": "admin@sometenant.onmicrosoft.com"
}

image

As result, the new settings are returned.

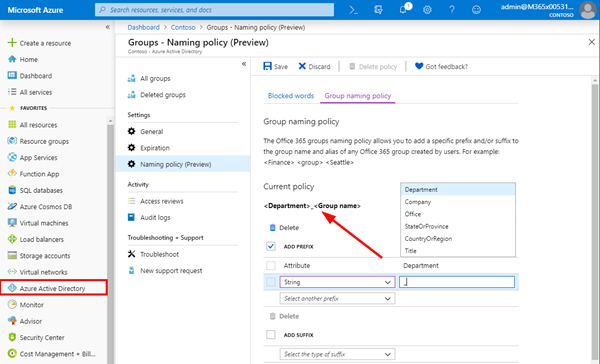
Set a Groups naming policy

Again, this can be done in the Azure Portal or with PowerShell. In here, Blocked words (a CSV file) can be uploaded and a Naming Policy can be defined as in the following screenshot.

image

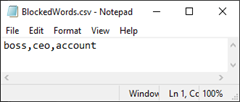
A BlockedWord.csv file can be downloaded from the portal, filled out and uploaded. The blocked words for group naming are simple stop words as here.

image

Get a Groups naming policy with Graph

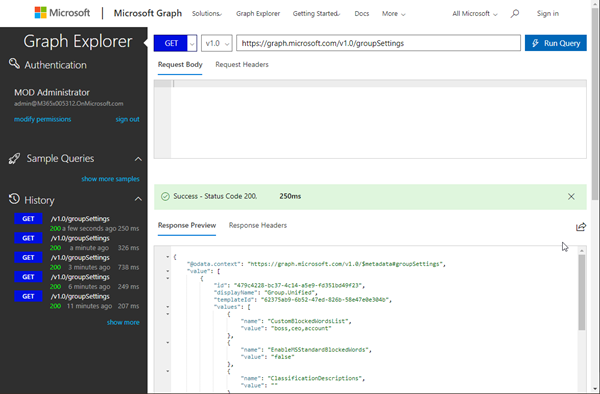
In Graph Explorer, we now see more group settings with a GET request against the groupSettings method.

https://graph.microsoft.com/v1.0/groupSettings

image

So, the complete result in my sample looks as here:

{
"@odata.context": "https://graph.microsoft.com/v1.0/$metadata#groupSettings",
"value": [
     {
         "id": "479c4228-bc37-4c14-a5e9-fd351bd49f23",
         "displayName": "Group.Unified",
         "templateId": "62375ab9-6b52-47ed-826b-58e47e0e304b",
         "values": [
             {
                 "name": "CustomBlockedWordsList",
                 "value": "boss,ceo,account"
             },
             {
                 "name": "EnableMSStandardBlockedWords",
                 "value": "false"
             },
             {
                 "name": "ClassificationDescriptions",
                 "value": ""
             },
             {
                 "name": "DefaultClassification",
                 "value": ""
             },
             {
                 "name": "PrefixSuffixNamingRequirement",
                 "value": "[Department]_[GroupName]"
             },
             {
                 "name": "AllowGuestsToBeGroupOwner",
                 "value": "false"
             },
             {
                 "name": "AllowGuestsToAccessGroups",
                 "value": "true"
             },
             {
                 "name": "GuestUsageGuidelinesUrl",
                 "value": ""
             },
             {
                 "name": "GroupCreationAllowedGroupId",
                 "value": ""
             },
             {
                 "name": "AllowToAddGuests",
                 "value": "true"
             },
             {
                 "name": "UsageGuidelinesUrl",
                 "value": ""
             },
             {
                 "name": "ClassificationList",
                 "value": ""
             },
             {
                 "name": "EnableGroupCreation",
                 "value": "true"
             }
         ]
     }
]
}

Modify tenant-wide groupSettings

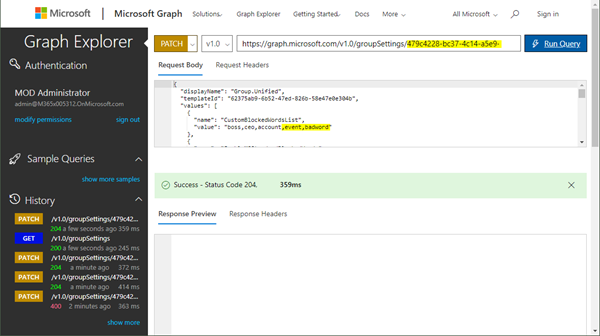
Again, we can modify settings with a PATCH operation as well. So, we add the settings id and the returned data with additional stop words again:

https://graph.microsoft.com/v1.0/groupSettings/479c4228-bc37-4c14-a5e9-fd351bd49f23
{
   "displayName": "Group.Unified",
   "templateId": "62375ab9-6b52-47ed-826b-58e47e0e304b",
   "values": [
    {
       "name": "CustomBlockedWordsList",
       "value": "boss,ceo,account,event,badword"
     },
     {
       "name": "EnableMSStandardBlockedWords",
       "value": "false"
     },
     {
       "name": "ClassificationDescriptions",
       "value": ""
     },
     {
       "name": "DefaultClassification",
       "value": ""
     },
     {
       "name": "PrefixSuffixNamingRequirement",
       "value": "[Department]_[GroupName]"
     },
     {
       "name": "AllowGuestsToBeGroupOwner",
       "value": "false"
     },
     {
       "name": "AllowGuestsToAccessGroups",
       "value": "true"
     },
     {
       "name": "GuestUsageGuidelinesUrl",
       "value": ""
     },
     {
       "name": "GroupCreationAllowedGroupId",
       "value": ""
     },
     {
       "name": "AllowToAddGuests",
       "value": "true"
     },
     {
       "name": "UsageGuidelinesUrl",
       "value": ""
     },
     {
       "name": "ClassificationList",
       "value": ""
     },
     {
       "name": "EnableGroupCreation",
       "value": "true"
     }
   ]
}

Adapt the request, as for classification, enable group creation or other settings as required. If successful, that request returns a HTTP status code 204 as here.

image

Another GET will deliver our new values. Simple as that.

Summary

The shown Graph methods above allow to programmatically access the new Office 365 group settings. We could use these queries for provisioning a new Office 365 Group or Team with a name that complies with the policy settings or develop our custom interface that informs the user about such tenant settings. It´s great to see that the Microsoft Graph evolves and we now can use the new methods for getting and setting group policies as required by your organization.

Finally, we hope you enjoyed our open source Office 365 Groups Governance Toolkit series. As a quick reference, find the articles here:

Project Online / Project Server: Project Detail Pages - Enhancements (Part 8)– Disable “Project Owner” Button on Project Detail Page

$
0
0

This is the eighth part of articles discussing Project Detail Page enhancements:

  1. Show/hide a field depending on the value of an internal field on the same page
  2. Show/hide a field depending on the value of an Enterprise Custom field on the same page
  3. Show/Hide a field based on the value of an internal field using REST
  4. Show/Hide a field based on the value of an Enterprise Custom Field without Lookup Table using REST
  5. Remove Time from Enterprise Custom Fields on Project Detail Pages
  6. Remove Prefix from Enterprise Custom Fields on Project Detail Pages
  7. Hide Impact Ratings on Project Detail Page "Strategic Impact"
  8. Disable “Project Owner” Button on Project Detail Page

For a description for preparation of a Project Detail Page for JavaScript, see General Preparation

In common scenarios, project managers are allowed to edit some projects not owned by themselves. With allowing this, they are also able to change the owner of a project to any other project manager, what may not be the indented behavior. As an administrator, you can disable the Owner button to prevent them from changing. In the following sample, the button will be disabled for everyone, except the current project owner and members of the group “Web Administrators (Project Web App Synchronized)”. In this SharePoint group, you will find all members of default Project Server group “Administrators”.

If you are working in an on premise environment, you will need to catch active delegate sessions, see “This part is only necessary with On Premise”. In Project Online, you can remove this part.

<!-- Change path for jquery-2.1.1.min.js --> <script type="text/javascript" src="/sites/PWA/Scripts/jquery-2.1.1.min.js"></script><script type="text/javascript">// add "Owner" in all used languages to this listvar buttonToHide = "Besitzer, Owner"


$(document).ready(ExecuteOrDelayUntilScriptLoaded(MainFunction, "sp.js"));function MainFunction() {//This part is only necessary with On Premise - begin  if (WPSC.WebPartPage.WebURL.indexOf("sharepoint.com") == 0) {
            CheckDelegate();if (Delegate == true) {
                console.log("Delegate session active - REST not working on premise");return;
            }
        }//This part is only necessary with On Premise - endif(_spPageContextInfo.userId != GetProjectOwner(PDP_projUid) && _spPageContextInfo.userId != CheckAdmin()){//window.alert('User is not member of admin group or owner of the project');
			hideButton();
		};
}//Get sharepoint user id of project ownerfunction GetProjectOwner(ProjectId) {var data = LoadRestSync(_spPageContextInfo.webAbsoluteUrl + "/_api/ProjectServer/Projects('" + ProjectId + "')/Owner");return data.d.Id;
}//Check if user is member of group "Web Administrators (Project Web App Synchronized)" containing all members of default Project Server group "Administrators"function CheckAdmin() {var data = LoadRestSync(_spPageContextInfo.webAbsoluteUrl + "/_api/Web/SiteGroups/getByName('Web%20Administrators%20(Project%20Web%20App%20Synchronized)')/Users()?$SELECT=Id&$Filter=Id eq " + _spPageContextInfo.userId);if(data.d.results[0] != undefined){return data.d.results[0].Id;
    }else{return 0;
    }
}function hideButton() {var buttons = document.getElementsByTagName('button');for (var i = 0, len = buttons.length; i < len; ++i) {if (buttonToHide.indexOf(buttons[i].title) > -1) {
                buttons[i].style.display = 'none';
            }
        }
    }	function LoadRestSync(url, methodType, parameters) {if (methodType === undefined || methodType == "") methodType = "GET";
    console.debug("LoadRestSync - Method:" + methodType);var result;
    console.log("LoadRestDataCrossSite: " + url);try {
        $.ajax({
            url: url,
            type: methodType,
            async: false,
            data: JSON.stringify(parameters),
            crossDomain: true,
            beforeSend: function (xhr) {
                xhr.withCredentials = true;
            },
            headers: {"accept": "application/json;odata=verbose","Content-Type": "application/json;odata=verbose;charset=utf-8","X-RequestDigest": _spPageContextInfo.formDigestValue
            },
            xhrFields: {
                withCredentials: true
            },
            success: function (data) {
                result = data;
            },

            error: function (data, errorCode, errorMessage) {
                console.error(data);
                console.error(errorCode);
                console.error(errorMessage);
            }

        });
    }
    catch (err) {
        console.error(err);
        console.error(url);
    }return result;
}	</script>

Copy above code into a text editor, modify at least the marked sections, save with file extension "js" or "html", and upload to your script library.

Delegate365 changelog version 8.3-GroupSync,Bulk operations and more improvements

$
0
0

The next version of Delegate365 v8.3 is here. This major version brings some new features as "Sync with security group", bulk assignments, list export, improved OU management, and many further features and fixes. See the details here.

  • Upgrading from Delegate365 version 8.2 does not require running a new setup. Upgrading from any other Delegate365 version, requires to (Re)run the setup.
  • New Sync Rule "Sync with security group": This new feature in Administration / Sync rules allows to remove users from an OU automatically based on their security group membership.  See how this works in detail at Sync with Group.
    d365-sync-1
    We hope this new sync feature helps improving your users organization based on security group memberships in Delegate365.
  • Bulk assign licenses uses license policy: In module Licenses / Bulk assign licenses, administrators can un-assign and assign licenses for multiple users. That can be tricky, since multiple users can have different licenses assigned and not setting a license or plan will remove that license or plan from all selected users. So, Administrators should know what they are execute in this module. Anyway, this module now considers a license policy that can be set for an Administrator. See details and a sample at Bulk assign licenses.
    image
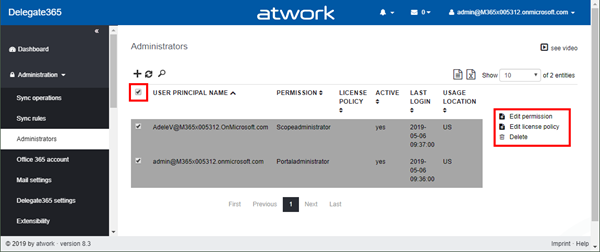
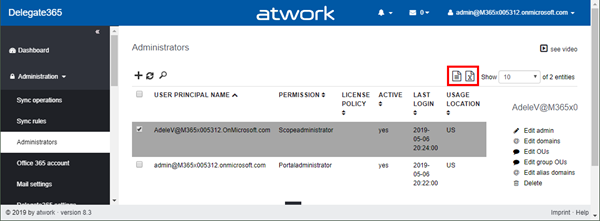
  • Administrator bulk operations: Setting the administrators permission and license policy now is easier. In module Administration / Administrators, multiple users can be selected. Then, the new menu is shown on the right side.
    image
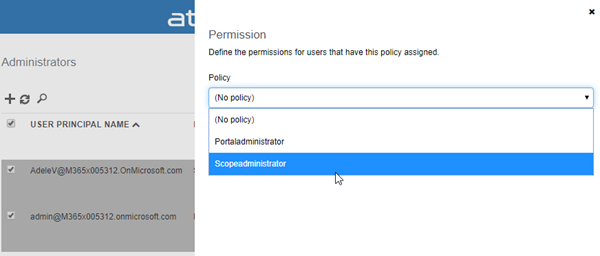
    This allows to set the permission policy…
    image
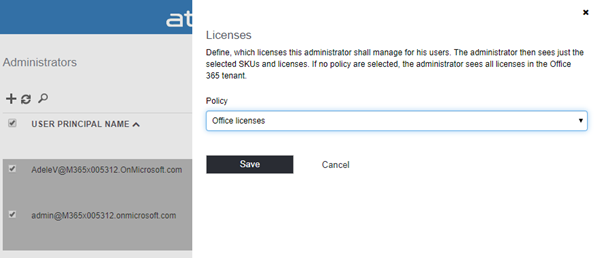
    …and the license policy for multiple administrators in one step.
    image
    Multiple administrators can be deleted in one step as well.
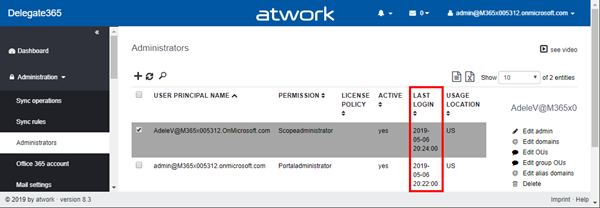
  • Administrators Last Login: The Administration / Administrators list now shows the last login of each Admin to identify admins that have been inactive for a longer time period.
    image
  • Export list data to a CSV and Excel file: The following modules now have an export function, for exporting data as CSV or Excel file for further processing: Administrators, Users, Shared Mailboxes, Resources, Contacts, Security Groups, Office365 Groups, Distribution Groups, Dynamic Groups.
    image
    Simply click on the icon on to of the table to download and open the generated file. The function exports all list data (not just the current page) to the file.
    image
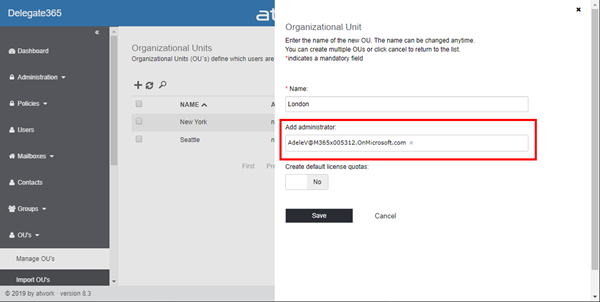
  • Create an OU with Admin-assignment: When creating a new OU, one or more administrators can be selected directly in the creation process. This saves extra steps.
    image
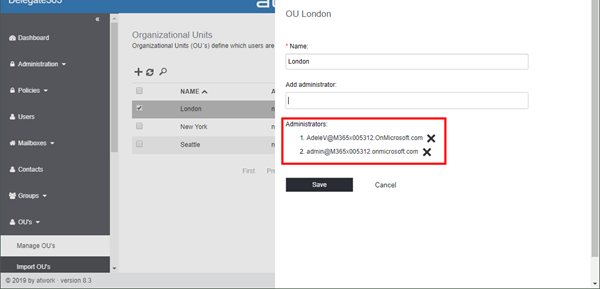
  • Edit an OU with remove Admins: Also, when clicking Edit, you can remove assigned administrators from an OU - and add new ones in one step.
    image
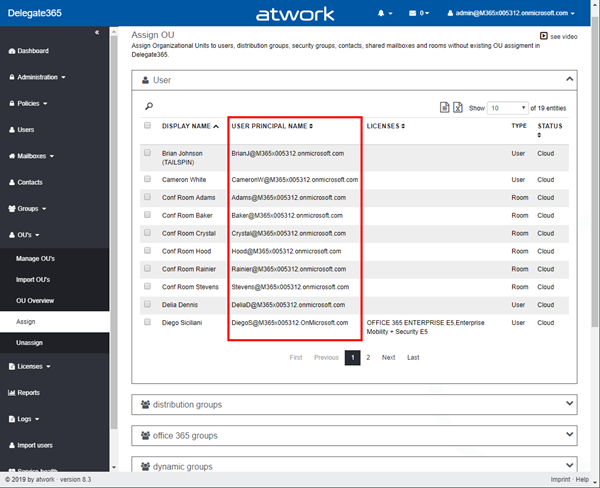
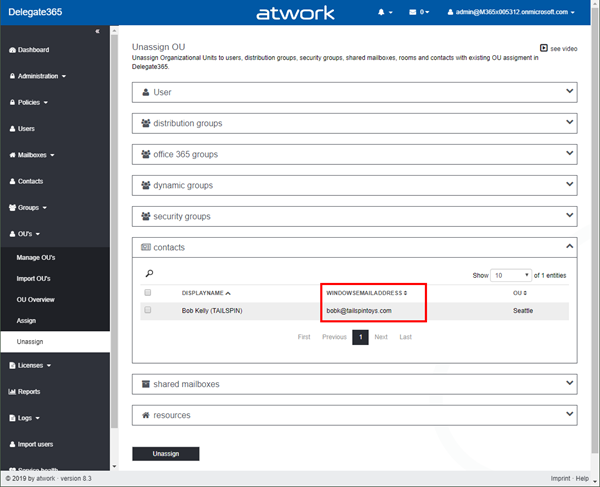
  • OU assign and unassign show the UPNs and allow search: The modules OU´s / Assign and Unassign have been extended to show the User Principal Names in all corresponding boxes User, Distribution groups (Primary SMTP address), Office 365 groups (Primary SMTP address), Dynamic groups (Primary SMTP address), Contacts (Windows email address), Shared Mailboxes (Primary SMTP address), and Resources (Primary SMTP address).
    image
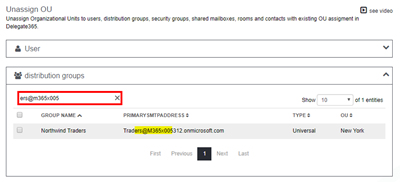
    The same goes for the unassigment-list as here.
    image
    The search box also looks in that field when searching, so, you can search for a part of the email address as well, as e.g. "ers@m365x005" finds all users with that expression.
    image
    This helps to identify and find the user objects, especially in large environments.
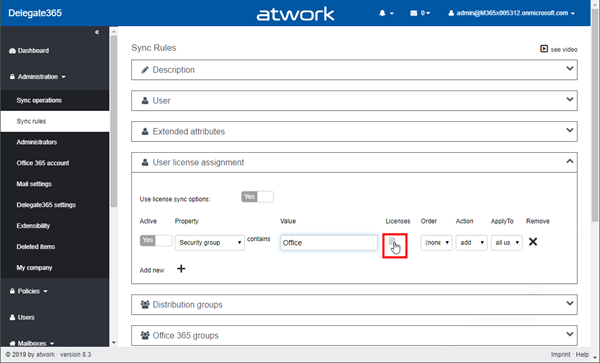
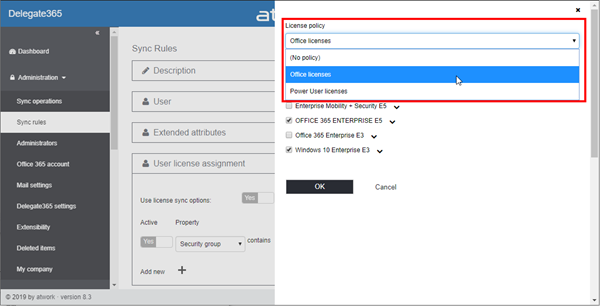
  • License policy added to Sync Rules: Administrators can now use a defined License Policy to use in the User license assignment settings.
    image
    When the Licenses icon is clicked, the panel opens and shows a dropdown with all existing license policies. This allows to select a predefined policy set and to user this as a template for individually select licenses and plans that shall be set for that rule.
    image
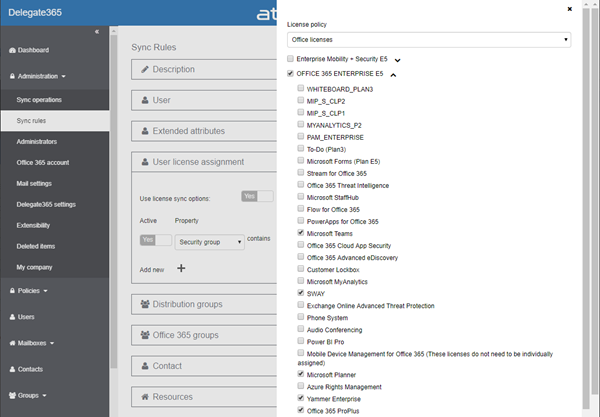
    As you can see, a selected license plan sets exactly the checkboxes as defined in the policy.
    image
    Remember that changing a license policy in the dropdown resets existing selected plans and overwrites them with the selected policy settings. Anyway, you need to confirm the settings with the OK button at the panel bottom to save them.
    Info: Be aware that changing a license policy does NOT modify any existing license assignment rules. The License policy dropdown is just for selecting the settings of the current policy to the license selection. This feature supports especially administrators who need to define many licenses assignment rules to be able to perform this operation with one click instead of setting each single license or plan. We hope this helps.
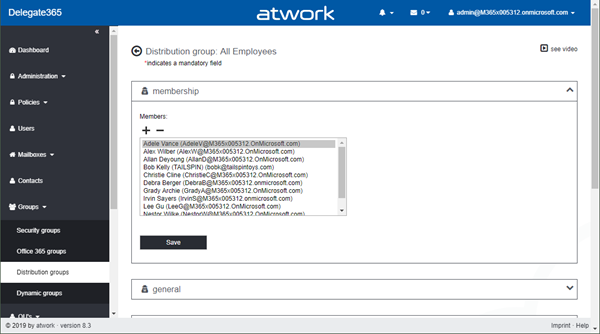
  • Members lists sorted: All members list are sorted now to quickly find a member, e.g. in Distribution List Members.
    image
  • Report Groups governance outsourced: The report generation was moved from the sync to the daily statistics task. So, the data is available for the day before.
  • Added a new endpoint HealthCheck for internal monitoring of telemetry data.
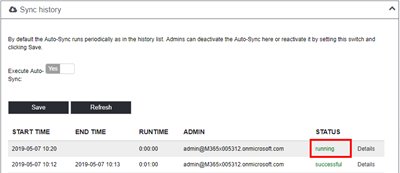
  • Initial Sync status is now "running" after the job has been started. Aborted jobs will be marked as "canceled".
    image
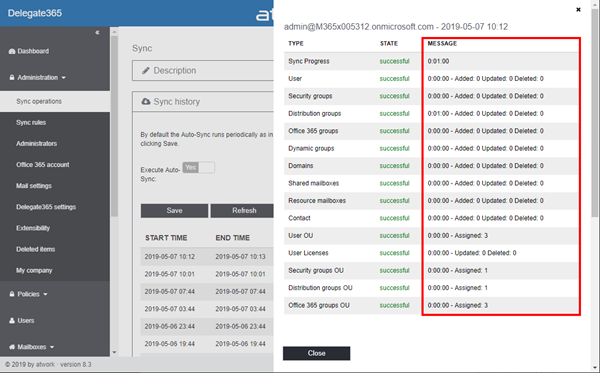
  • Sync shows short summary: The sync operation shows the number of added, updated and deleted objects in the Details panel as here.
    image
    In this sample, existing users have been assigned as members of security groups and groups have been added to OU´s based on their Display Name, as defined in the Sync Rules.
  • Additional small fixes, as removed user edit validations so that user properties can contain special characters, e.g. department "R & D" etc.

We hope this new features support in organizing your management with Delegate365!

#MSBUILD 2019 News

$
0
0

This week, from May 6-8, Microsoft BUILD conference is happening near Microsoft´s home in Seattle, WA. With about 6000 people from around the world, BUILD is Microsoft´s largest yearly developer conference. This year, we learned tons of news, and the best part is, you get the content for free and you can find a complete guide of all news announced at Build here.

Find the highlights and the news at news.microsoft.com/build2019:

image

I want to point out the Book of News that contains a cool summarization of the announcements – the new topics presented at #MSBUILD:

Get it directly at aka.ms/Build2019BookofNews.

"The 2019 Build Book of News is your guide to ALL announcements at our leading developer event … about the latest developer, cloud, and collaboration trends and solutions."

So, check it out and have fun watching the cool presentations of BUILD in the next weeks (and months)! Winking smile

Project: Makros implementieren / Implement Macros

$
0
0
  1. Deutsch
  2. English

Deutsch

In Foren wird häufig nach Automatisierungen gefragt, die mit Makros umgesetzt werden können. In diesem Artikel wird beschrieben, wie diese Makros in ein Projekt, auf den eigenen Rechner oder in Project Online / Project Server übernommen werden können. In künftigen Artikeln folgen dann Makros, die häufig im Einsatz sind. Verfügbare Makros sind unter VBA zu finden.

Makro einfügen

Um ein vorhandenes Makro in Project zu übernehmen, wird der Editor Microsoft Visual Basic for Applications benötigt. Starten Sie den Editor über Ansicht – Makros – Visual Basic oder drücken Sie die Taste F11.

image

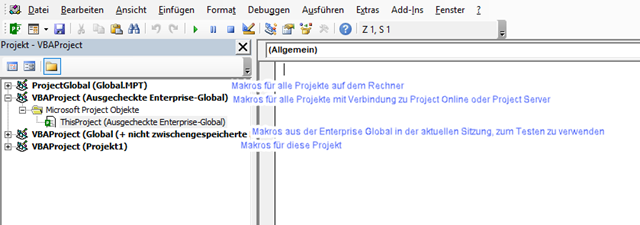
Im Editor sehen Sie ein Baumstruktur für verfügbare Projekte.

  • ProjectGlobal(Global.MPT): Hier handelt es sich um die globale Projektvorlage. Makros die Sie diesem Projekt hinzufügen, stehen in allen Projekten auf Ihrem Rechner zur Verfügung.
  • VBAProject (Ausgecheckte Enterprise-Global): Dieses Projekt wird nur angezeigt, wenn Project mit einer Verbindung zu Project Online oder Project Server gestartet wurde und die Enterprise Global geöffnet wurde. Fügen Sie Makros hier ein, wenn sie für alle Anwender bei Verbindung mit Project Server oder Project Online auf allen Rechnern zur Verfügung stehen sollen.
  • VBAProject (Global(+ nicht zwischengespeicherte Ent…) Dieses Projekt wird nur angezeigt, wenn Project mit einer Verbindung zu Project Online oder Project Server gestartet wurde. Inhalte dieses Projekts stammen vom Server. Änderungen an dieser Stelle stehen nur in der aktuellen Sitzung zur Verfügung. Ich empfehle dringend, Makros zum Testen erst in dieses Projekt einzufügen, bevor Sie es in VBAProject (Ausgecheckte Enterprise-Global) übernehmen.
  • VBAProject (<Projektname>): Für jedes geöffnete Projekt wird ein Eintrag mit dem jeweiligen Projektnamen angezeigt.

image

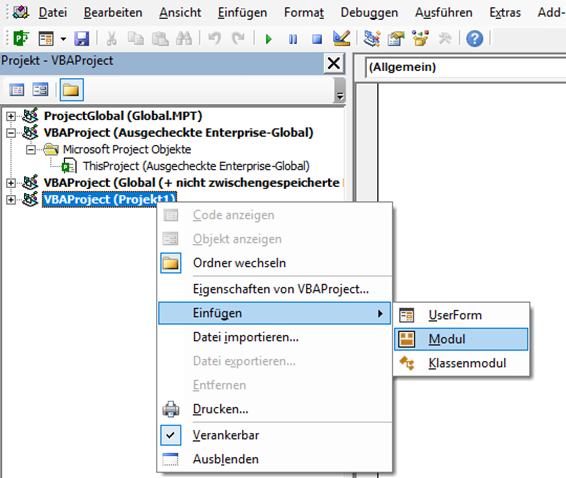
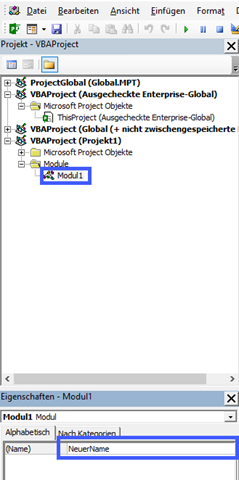
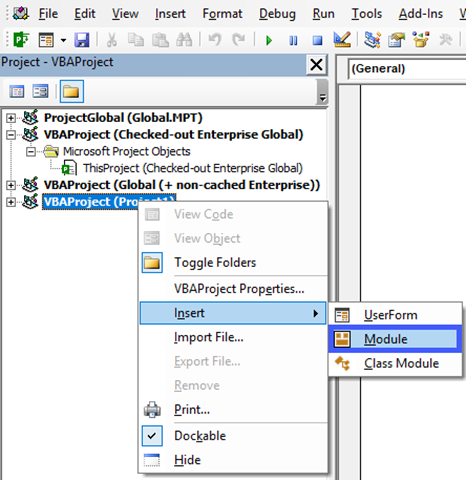
Um ein Makro hinzuzufügen, klicken Sie mit der rechten Maustaste auf das gewünschte Zielprojekt und klicken Sie im Kontextmenü auf Einfügen. Wählen Sie danach den Eintrag Modul.

image

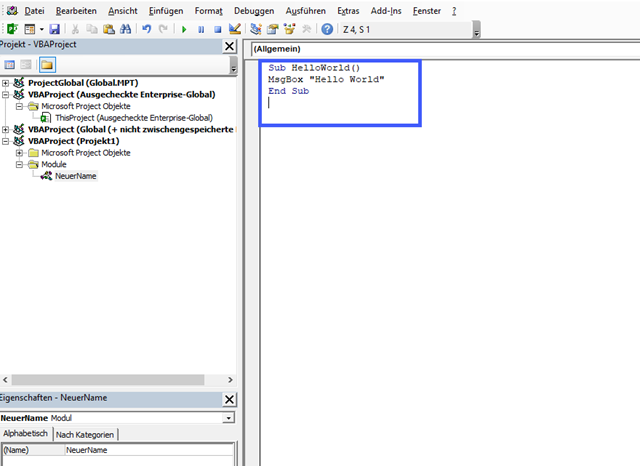
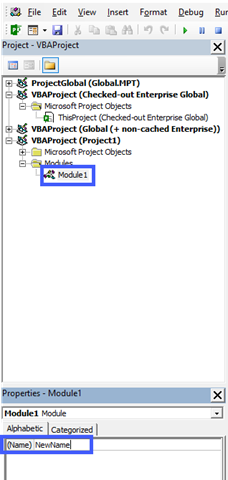
Sie können dem neu erstellten Modul einen informativen Namen geben. Geben Sie dazu in das Feld Name in den Moduleigenschaften den neuen Namen ein. In das große Fenster können Sie Makros aus anderen Quellen einfügen oder eigene Makros erstellen.

image

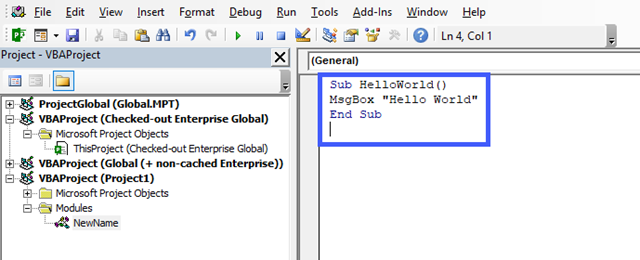
In das große Fenster können Sie Makros aus anderen Quellen einfügen oder eigene Makros erstellen.

image

Makro starten

Starten Sie ein Makro über Ansicht – Makros – Makros anzeigen.

image

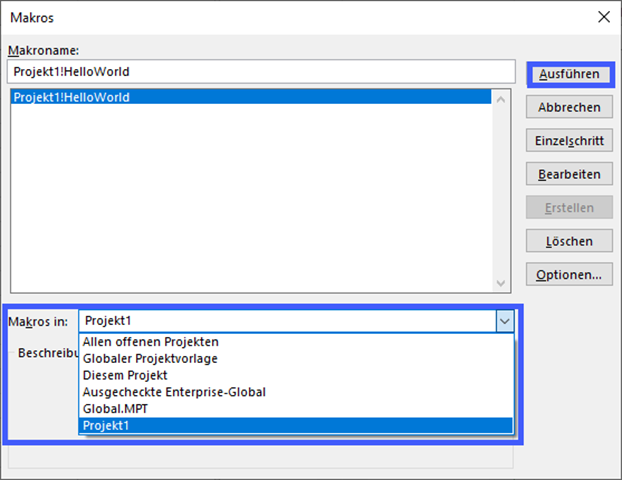
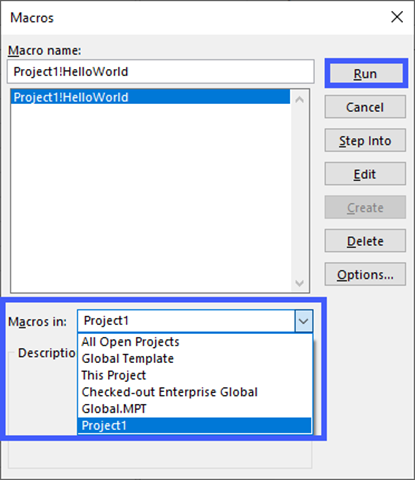
Wählen Sie bei Bedarf das Projekt, das das Makro beinhaltet in Makros in aus. Markieren Sie das gewünschte Projekt und klicken Sie auf Ausführen.

image

Sicherheitseinstellungen

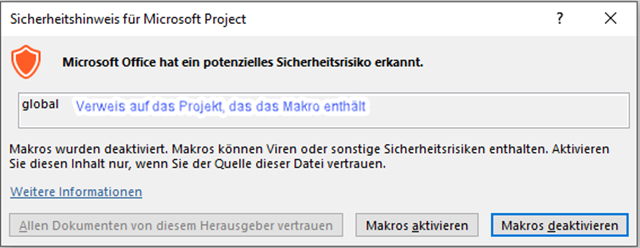
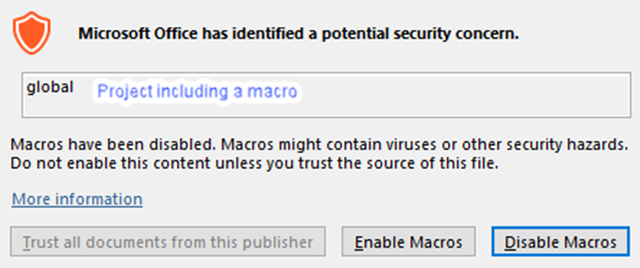
Wenn Makros in Project oder in einem Projektplan enthalten sind, sehen Sie mit den Standardeinstellungen eine Warnmeldung beim Start von Project und/oder beim Öffnen eines Projektplans. Sie können dann wahlweise Makros aktivieren oder deaktivieren.

image

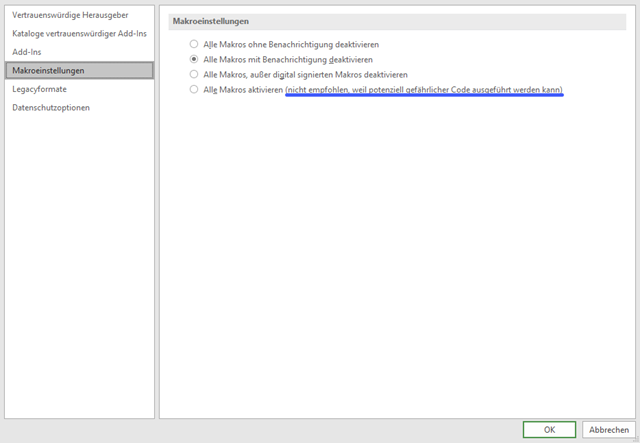
Wenn Sie über eine digitale Signatur verfügen oder nur eigene Makros in Project und Projektplänen haben, können Sie die Warnmeldung auch deaktivieren. Wählen Sie dazu unter Ansicht – Makros – Makrosicherheit..

SNAGHTML982e2cf

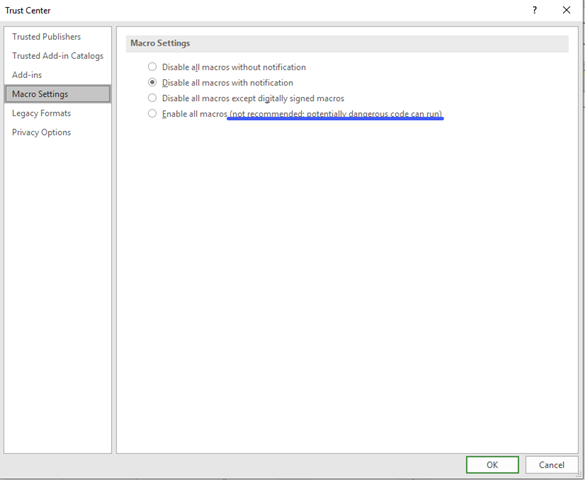
Im Dialogfenster Trust-Center können Sie die gewünschte Einstellung vornehmen. Beachten und bedenken Sie dabei die Warnmeldung für die Option Alle Makros aktivieren.

image

English

In forums, there are often requests for automations that can be implemented with macros. This article describes how to apply these macros to a project, to your own machine, or to Project Online / Project Server. Future articles will be followed by macros that are frequently in use. All available macros can be found at VBA.

To implement an existing macro in Project, you need the Microsoft Visual Basic for Applications editor. Start the editor via View - Macros - Visual Basic or hit key F11.

SNAGHTML98919ef

The editor displays a tree for available projects.

  • ProjectGlobal (Global.MPT): This is the global project template. Macros you add to this project are available in all projects on your computer.
  • VBAProject (Checked-out Enterprise Global): This project only appears if Project has been started with a connection to Project Online or Project Server and the Enterprise Global has been opened. Insert macros here if they are to be available to all users when connected to Project Server or Project Online on all machines.
  • VBAProject (Global (+ non-cached Entnterprise) This project will only be displayed if Project has been started with a connection to Project Online or Project Server Content of this project comes from the server Changes in this location are only available in the current session I strongly recommend that you include macros for testing in this project before applying them to VBAProject (Checked Enterprise Global).
  • VBAProject (<project name>): For each open project, an entry with the respective project name is displayed.

image

To add a macro, right-click on the desired target project and click on Insert in the context menu. Then select the entry Module.

image

You can give the newly created module an informative name. To do this, enter the new name in the Name field in the module properties.

SNAGHTML9928b1c

In the large window, you can insert macros from other sources or create your own macros.

image

Start Macro

Start a macro via View - Macros - View Macros.

SNAGHTML995de1f

If necessary, select the project that contains the macro in macros. Select the desired project and click on Run.

image

Security Settings

If macros are included in Project or in a project plan, the defaults will warn you when Project starts and / or when you open a project plan. You can then optionally enable or disable macros.

image

If you have a digital signature or only have your own macros in Project and Project Plans, you can also disable the warning message. Choose under View - Macros - Macro Security.

SNAGHTML9a0c998

In the Trust Center dialog box, you can make the desired setting. Note and consider the warning message for the Enable all macros option.

image

Project: Zuordnungseinheiten neu berechnen / Recalculate Assignment Units

$
0
0
  1. Deutsch
  2. English
  3. Code

Deutsch

Im Artikel Zuordnungseinheiten in Project ab Version 2010 ist beschrieben, weshalb die Anzeige der Zuordnungseinheiten bei der Änderung von Dauer oder Arbeit ab Project 2010 nicht aktualisiert wird. Rod Gill aus Australien hat dazu ein Makro zur Verfügung gestellt, mit dem die Neuberechnung der Zuordnungseinheiten erfolgen kann: Reset Assignment Units. In Europa verwenden wir jedoch andere Regionaleinstellungen, daher finden Sie hier eine modifizierte Version.

In Makros implementieren / Implement Macros wird beschrieben, wie ein Makro in Project übernommen werden kann.Mehr Beispielmakros sind unter VBA zu finden.

English

The article Assignment Units in Project 2010 describes why the display of the assignment units is not updated when changing the duration or the work as of Project 2010. Rod Gill from Australia has provided a macro that can be used to recalculate the allocation units: Reset Assignment Units. In Europe, however, we use different regional settings, so you will find here a modified version.

Implementing Macros / Implement Macros describes how to apply a macro to Project. More sample code is available at VBA.

Code

Sub RefreshUnits()'***********************************************************************************'Code is provided “AS IS” without warranty of any kind, either expressed or implied,'including but not limited to the implied warranties of merchantability and/or'fitness for a particular purpose.'***********************************************************************************Dim Tsk As TaskDim Assgn As AssignmentDim v_Version AsIntegerDim v_StartDate AsDateDim v_TaskType AsLongDim v_Work AsLongDim v_v_MsgText AsString'Originally developed by Rod Gill - thanks for providing!!!'http://www.project-systems.co.nz/project-vba-macros/AssignmentUnitsReset.html'This macro runs on active Project 2010 and higher only.'Information for Assignmentunit Change at'http://blogs.msdn.com/b/project/archive/2010/04/29/assignment-units-in-project-2010.aspx'Modifications by Barbara Henhapl, http://www.henhapl.net' 1. Undo implemented' 2. Enable different regional settings'Please distribute with reference to'http://www.projectvbabook.com/VBA-Sample-Code/VBASampleResetAssignmentUnits.html only'Check version, with respect to regional settingsIfCInt(Replace(Application.Version, ".", Application.DecimalSeparator)) < 14 ThenSelectCase Application.LocaleIDCase 1031 'German
                        v_MsgText = "Dieses Makro ist nur für Project 2010 und höher sinnvoll, " _& "daher wird das Makro nun beendet."Case 1036  'French
                       v_MsgText = "Cette macro n'est utile que pour Project 2010 et les " _& "versions ultérieures. Elle sera donc terminée."Case 1043  'Dutch
                       v_MsgText = "Deze macro is alleen nuttig voor Project 2010 en later," _& " dus de macro wordt nu beëindigd."CaseElse' English and other
                        v_MsgText = "This macro is only useful for Project 2010 and later," _& " so macro is ended."EndSelect
                MsgBox v_MsgText, vbCritical + vbOKOnlyElse'Open a transaction to enable "Undo"
                Application.OpenUndoTransaction ("Refresh Units")ForEach Tsk In ActiveProject.TasksIfNot Tsk IsNothingThen'Only adjust Units for an Auto, incomplete, non-summary and active Task,'with AssignmentsIf Tsk.PercentComplete < 100 _AndNot Tsk.Summary _And Tsk.Active _And Tsk.Manual = False _And Tsk.Assignments.Count > 0 Then'no action required for tasks'without assignment'For recalculation of AssignmentUnits Task Type "Fixed Duration"'is required.'The original Task Type has to be set afterwards, keep the value
                            v_TaskType = Tsk.Type
                            Tsk.Type = pjFixedDurationForEach Assgn In Tsk.Assignments'Only adjust tasks not yet completedIf Assgn.PercentWorkComplete < 100 Then'Get the resume date for CompletedThroughIf Assgn.PercentWorkComplete > 0 Then
                                        v_StartDate = Tsk.Resume  'This is not necessarily'accurate but is close enoughElse
                                        v_StartDate = Assgn.StartEndIf'Keep work, since it will change during the following steps
                                    v_Work = Assgn.Work'IMPORTANT: For calculation of Remaining Duration, function'Application.DateDifference has to be used, since only this'function respects calendar exceptionsücksichtigt'If resource calendar are not set to "ignore", this calendar'has to be respected for calculation of Remaining Duration.'if there is no task calendar applied, Project calendar is'applied implicitely as task calendarIfNot Tsk.IgnoreResourceCalendar Then
                                        RemDur = Application.DateDifference _
                                        (v_StartDate, Assgn.Finish, Assgn.Resource.Calendar)Else
                                        RemDur = Application.DateDifference _
                                        (v_StartDate, _
                                         Assgn.Finish, _
                                         ActiveProject.BaseCalendars(Tsk.Calendar))EndIf'If there is RemainingDuration, AssignmentUnits are recalculated.'Afterwards, Assignment Work has to be set to the original valueIf RemDur > 0 Then
                                        Assgn.Units = Assgn.RemainingWork / RemDur
                                        Assgn.Work = v_WorkEndIfEndIfNext Assgn'Re-apply original Task Type
                            Tsk.Type = v_TaskTypeEndIfEndIfNext Tsk
                Application.CloseUndoTransactionEndIfEndSub

Get the Microsoft Graph g-raph stickers

$
0
0

If you are a Microsoft 365 developer, you will be working with the Microsoft Graph to access data in the cloud. Of course, every product needs a mascot. So, the Microsoft Graph team created their own mascot: Welcome, Microsoft Graph g-raph (giraffe). Get the artwork for the Microsoft Graph g-raph here!

Image of Yaktocat

For me, the g-raph is a very cute and perfect visualization of "connecting the dots" within the Microsoft 365 services with Microsoft Graph technology.

As Jeremy Thake, Principal Program Manager in the #MicrosoftGraph team, recently wrote on Twitter, they ran out of stickers at #MSBuild conference, see https://twitter.com/jthake/status/1128699954707361794. So, the team made the artwork available for everyone to use.

image

The mascot can be used to print your own stickers to hand out to the community. As pretty as the giraffe is, please note: Please do not modify the sticker in any way and print as is.

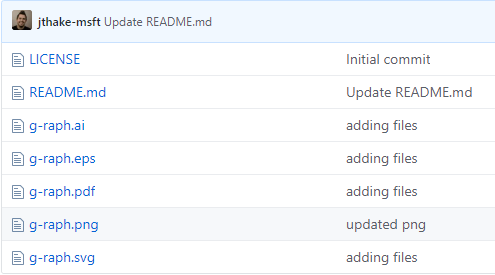
So, get the graphics in various file formats from GitHub.

image

Perfect for developers. And cute!

Project: Export PSP in Office / Export WBS to Office

$
0
0
  1. Deutsch
  2. English
  3. Code: Referenzen beim Öffnen aktivieren / Enable References on Open
  4. Code: Referenzen aktivieren / Enable References
  5. Code: Export PSP / Export WBS

Deutsch

Leider bietet Project keine Möglichkeit, die Planung als PSP zu exportieren. Diese Anforderung wird aber oft in Foren und auch von Kunden gestellt. Ich stelle hier ein Makro bereit, dass eine SmartArt Grafik in Excel, Word und PowerPoint bereitstellt. Um aus Project eine dieser Officeanwendungen anzuprechen, müssen Verweise für die jeweilige Anwenung gesetzt sein. Die Verweise sind optimalerweise in der globalen Vorlage zu setzen. Beim Arbeiten ohne Verbindung zu Project Online / Project Server ist das die Datei Global.mpt. Diese Datei enthält alle Objekte, die auf dem Rechner für alle Projekte zur Verfügung stehen. Bei Verbindung mit Project Online / Project Server sind die Verweise in der Enterprise Global zu aktivieren.

Verweise manuell aktivieren

Diese Verweise können manuell aktiviert werden. Öffnen Sie dazu den Visual Basic Editor. Stellen Sie sicher, dass ProjectGlobal(Global.MPT) bzw. VBAProject (Ausgecheckte Enterprise-Global) aktiviert ist. Öffnen Sie den Verweis-Dialog mit Extras – Verweise.

SNAGHTMLd30e8e4

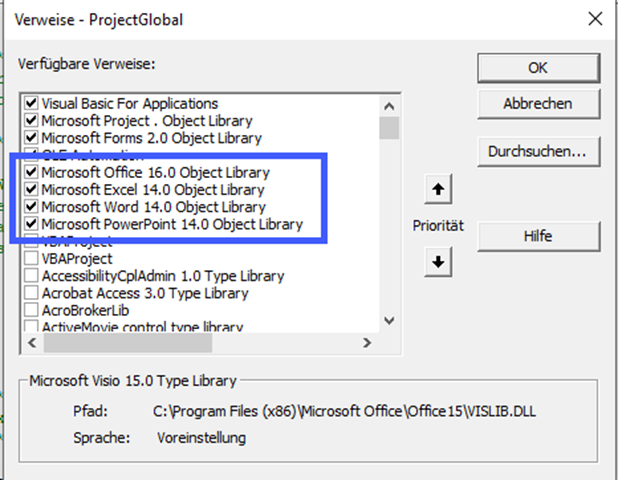
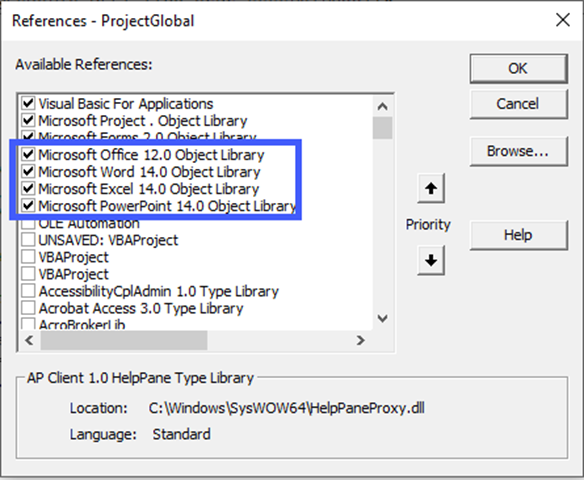
Es werden die Verweise für die drei Officeanwendungen und Microsoft Office benötigt. Die Versionsnummer kann sich auf Ihrem Rechner unterscheiden, wählen Sie die aktuellste Version, sofern mehr als eine zur Verfügung steht.

image

Verweise per Makro aktivieren

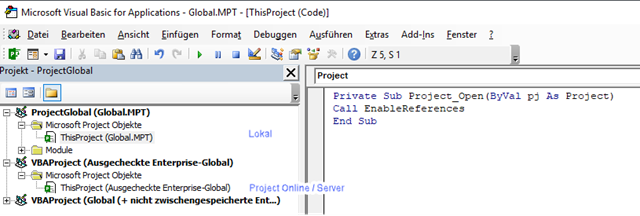
Die Verweise können aber auch über ein Makro gesetzt werden, dass Sie bei jedem Öffnen einen Projekts ausführen. Wenn Sie diese Lösung bevorzugen, fügen Sie den Code: Referenzen beim Öffnen aktivieren / Enable References on Open in ThisProject der entsprechenden Umgebung ein. Dieser Code wird bei jedem Öffnen ausgeführt und ruft die Prozedur zum Setzen der Verweise auf.

SNAGHTMLd3ce7d0

Fügen Sie den Code: Referenzen aktivieren / Enable References in ein vorhandenes oder ein neues Modul ein. Diese Prozedur repariert oder setzt die erforderlichen Referenzen, sofern eine Änderung erforderlich ist.

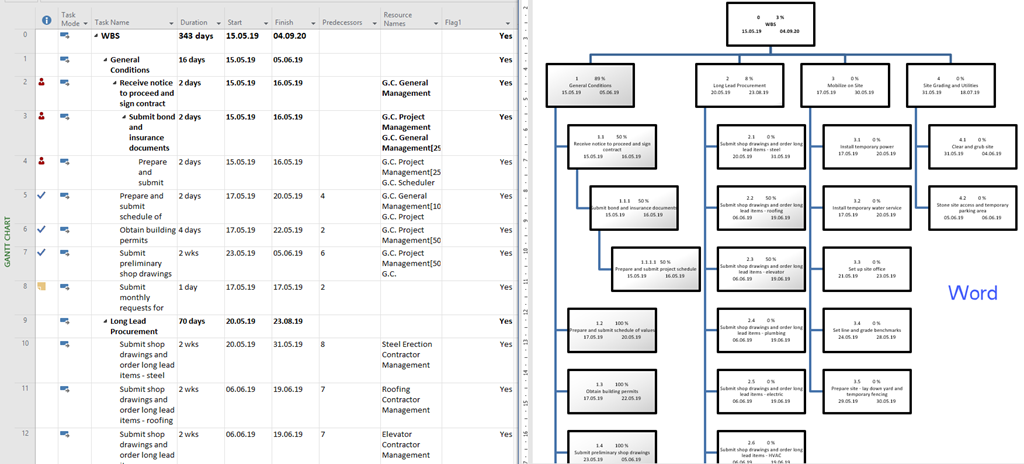
Wenn sichergestellt ist, dass die Referenzen vorhanden sind (manuell oder per Makro), können Sie das Makro aus Code: Export PSP / Export WBS  in ein vorhandenes oder neues Modul einfügen. Dieses Makro lässt Sie die Zielanwendung (Word, Excel oder PowerPoint) auswählen. Es exportiert alle Vorgänge als PSP, für die das Feld Attribut1 auf Ja gesetzt ist. Sie können das ändern, indem Sie die globale Konstante C_TaskExportValue auf Falseändern. Die Prüfung für dieses Feld ist implementiert, um den Export für sehr große Projekte einschränken zu können.

image

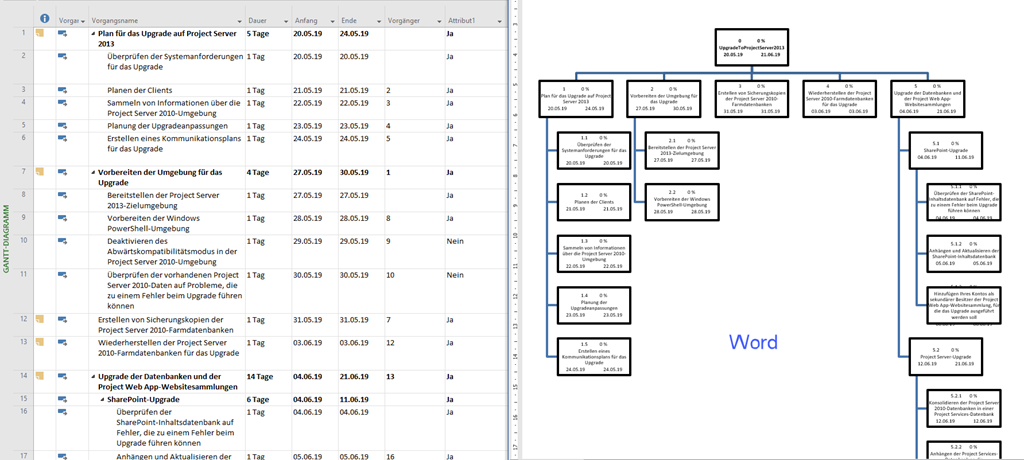
Nach Start des Makros für Word ergibt sich folgendes Bild:

image

In Makros implementieren / Implement Macros wird beschrieben, wie ein Makro in Project übernommen werden kann. Mehr Beispielmakros sind unter VBA zu finden.

English

Unfortunately, Project does not provide a way to export the planning as a WBS. However, this requirement is often asked in forums and also by customers. Here's a macro that provides a SmartArt graphic in Excel, Word, and PowerPoint. In order to run one of these office applications from Project, references must be set to the respective application. The references should ideally be placed in the global template. When working without connecting to Project Online / Project Server, this is the Global.mpt file. This file contains all the objects that are available on the computer for all projects. When connecting to Project Online / Project Server, you must enable the references in Enterprise Global.

Activate References Manually

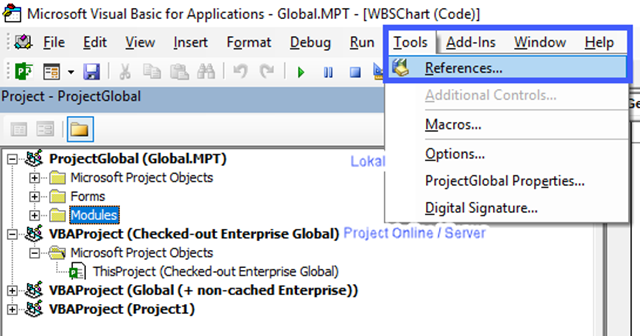
These references can be activated manually. Open the Visual Basic Editor. Make sure that ProjectGlobal (Global.MPT) or VBAProject (Checked-Out Enterprise Global) is enabled. Open the References dialog with Tools - References.

image

The references for the three office applications and Microsoft Office are needed. The version number may differ on your machine, choose the latest version, if more than one is available.

image

Active References by Macro

Paste the Code: Enable References / Enable References in an existing or a new module. This procedure repairs or sets the needed references if a change is required.
If it is guaranteed that the references are present (manually or by macro), you can insert the macro from Code: Export PSP / Export WBS into an existing or new module. This macro lets you select the target application (Word, Excel or PowerPoint). It exports all operations as PSP for which Flag1 field is set to Yes. You can change this behavior by changing the global constant C_TaskExportValue to False. The check for this field is implemented to limit export for very large projects.

image

Running this macro for Word will provide the following:

image

Implementing Macros / Implement Macros describes how to apply a macro to Project. More sample code is available at VBA.

Code: Referenzen beim Öffnen aktivieren / Enable References on Open

PrivateSub Project_Open(ByVal pj As Project)Call EnableReferencesEndSub

Code: Referenzen aktivieren / Enable References

'Constants and VariablesGlobalConst c_Office = "{2DF8D04C-5BFA-101B-BDE5-00AA0044DE52}"GlobalConst c_Excel = "{00020813-0000-0000-C000-000000000046}"GlobalConst c_Word = "{00020905-0000-0000-C000-000000000046}"GlobalConst c_PowerPoint = "{91493440-5A91-11CF-8700-00AA0060263B}"Sub EnableReferences()'***********************************************************************************'Code is provided “AS IS” without warranty of any kind, either expressed or implied,'including but not limited to the implied warranties of merchantability and/or'fitness for a particular purpose.'***********************************************************************************'This Procedure will not create the WBSChart, but enable all references'necessary for creating chart. References have to be set befor calling'procedure to actually create the chart'If references are set manually, this procedure can be omittedDim strGUID AsVariantDim theRefs AsVariantDim theRef AsVariantDim i AsLong'*****************************************************************************'**** Set references for SmartArt, Excel, Word and Powerpoint'*****************************************************************************Set theRefs = Application.VBE.VBProjects(1).ReferencesWith theRefs'****Remove broken referencesFor i = theRefs.Count To 1 Step -1Set theRef = .Item(i)If theRef.isbroken = TrueThen
                .References.Remove theRefEndIfNext i'****Errors have to be omitted in this caseOnErrorResumeNext'Office
        .AddFromGuid Guid:=c_Office, major:=1, Minor:=0'Application.VBE.ActiveVBProject.References.AddFromGuid Guid:=c_Office, major:=1, Minor:=0'Evaluate errorSelectCase Err.NumberCase 32813'Reference already set, no action requiredCase vbNullString'Reference successfully setCaseElse'Error while setting reference - exit subGoTo Ref_ErrorEndSelect'Excel
        .AddFromGuid Guid:=c_Excel, major:=1, Minor:=0'Evaluate errorSelectCase Err.NumberCase 32813'Reference already set, no action requiredCase vbNullString'Reference successfully setCaseElse'Error while setting reference - exit subGoTo Ref_ErrorEndSelect'Word
        .AddFromGuid Guid:=c_Word, major:=1, Minor:=0'Fehler interpretierenSelectCase Err.NumberCase 32813'Referenz schon gesetzt - keine Aktivität erforderlichCase vbNullString'Referenz ohne Problem gesetztCaseElse'Unbekannter Fehler - AbbruchGoTo Ref_ErrorEndSelect'PowerPoint
        .AddFromGuid Guid:=c_PowerPoint, major:=1, Minor:=0'Evaluate errorSelectCase Err.NumberCase 32813'Reference already set, no action requiredCase vbNullString'Reference successfully setCaseElse'Error while setting reference - exit subGoTo Ref_ErrorEndSelectEndWith'****Re-enable errorsOnErrorGoTo 0ExitSub
    Ref_Error:
            MsgBox "There was an issue activating"& vbNewLine _& "a required reference."& vbNewLine _& "Macro ended!", vbCritical + vbOKOnly, "Error!"ExitSub
    End Sub

Code: Export PSP / Export WBS

GlobalConst c_TaskExportValue = True'Define if Flag1 has to be true or false to be exportedSub WBSChart()'***********************************************************************************'Code is provided “AS IS” without warranty of any kind, either expressed or implied,'including but not limited to the implied warranties of merchantability and/or'fitness for a particular purpose.'***********************************************************************************Dim obj_App         AsObjectDim obj_File        AsObjectDim obj_Target      AsObjectDim oSAlayout       As Office.SmartArtLayoutDim obj_Shape       AsObjectDim oshp            As SmartArtDim v_App           AsStringDim P               As ProjectDim T               As Task'****Get target application
v_App = "Please select target application for WBS Export"& vbCrLf
v_App = v_App & "1 - Word"& vbCrLf
v_App = v_App & "2 - Excel"& vbCrLf
v_App = v_App & "3 - PowerPoint"& vbCrLf
v_App = InputBox(v_App, "Target Application")SelectCase v_AppCase""
        MsgBox "No application selected. Macro will be terminated"ExitSub
    Case "1"
        v_App = "Word"Case"2"
        v_App = "Excel"Case"3"
        v_App = "PowerPoint"CaseElse
        MsgBox "Invalid input. Macro will be terminated"ExitSub
End SelectSet P = ActiveProjectOnErrorResumeNextSelectCase v_AppCase"Excel"Set obj_App = GetObject(, "Excel.Application")OnErrorGoTo 0If obj_App IsNothingThenSet obj_App = CreateObject("Excel.Application")EndIf
        obj_App.Visible = TrueOnErrorResumeNextSet obj_File = obj_App.ActiveWorkbookOnErrorGoTo 0If obj_File IsNothingThenSet obj_File = obj_App.Workbooks.Add'New workbook, we can use default sheetSet obj_Target = obj_File.ActiveSheetElse'Existing workbook, get a new sheet to avoid overwriteSet obj_Target = obj_File.Sheets.AddEndIfSet oSAlayout = obj_App.SmartArtLayouts("urn:microsoft.com/office/officeart/2005/8/layout/orgChart1")Set obj_Shape = obj_Target.Shapes.AddSmartArt(oSAlayout)Case"Word"Set obj_App = GetObject(, "Word.Application")OnErrorGoTo 0If obj_App IsNothingThenSet obj_App = CreateObject("Word.Application")EndIf
        obj_App.Visible = TrueOnErrorResumeNextSet obj_File = obj_App.ActiveDocumentOnErrorGoTo 0If obj_File IsNothingThenSet obj_File = obj_App.Documents.AddEndIf'Get end of documentSet obj_Target = obj_File.Range(obj_File.Range.End - 1, obj_File.Range.End)'add a new line in document
        obj_Target = vbCrLfSet obj_Target = obj_File.Range(obj_File.Range.End - 1, obj_File.Range.End)Set oSAlayout = obj_App.SmartArtLayouts("urn:microsoft.com/office/officeart/2005/8/layout/orgChart1")Set obj_Shape = obj_File.InlineShapes.AddSmartArt(oSAlayout)Case"PowerPoint"Set obj_App = GetObject(, "PowerPoint.Application")OnErrorGoTo 0If obj_App IsNothingThenSet obj_App = CreateObject("PowerPoint.Application")EndIfOnErrorResumeNextSet obj_File = obj_App.ActivePresentationOnErrorGoTo 0If obj_File IsNothingThenSet obj_File = obj_App.Presentations.AddEndIfDim pptLayout AsObjectSet pptLayout = obj_File.SlideMaster.CustomLayouts.Item(7)
        obj_App.Visible = TrueSet obj_Target = obj_File.Slides.AddSlide(obj_File.Slides.Count + 1, pptLayout)Set oSAlayout = obj_App.SmartArtLayouts("urn:microsoft.com/office/officeart/2005/8/layout/orgChart1")Set obj_Shape = obj_Target.Shapes.AddSmartArt(oSAlayout)EndSelectSet oshp = obj_Shape.SmartArt
    obj_Shape.Height = 600'By default, SMartart is added with some nodes. Remove them initiallyFor i = 1 To 5
        oshp.AllNodes(1).DeleteNext i'Add Project Summay Task as root nodeSet MyRootNode = oshp.AllNodes.AddWith MyRootNodeSet MyRootNode = NodeContent(MyRootNode, P.ProjectSummaryTask)'Project Summary Task as bold
        .TextFrame2.TextRange.Font.Bold = TrueEndWith'Outlinelevel 1 as "msoSmartArtNodeBelow" to get them in the second rowForEach T In P.TasksIfNot T IsNothingThenIf T.OutlineLevel = 1 ThenSet MyParentNode = AddMyNode(MyRootNode, True, T)EndIfEndIfNext T


Application.Visible = True
Application.ScreenUpdating = True
Application.StatusBar = FalseOnErrorGoTo 0

MsgBox "Done"
obj_App.Visible = TrueExitSub
LastError:

obj_File.ScreenUpdating = True
obj_File.Visible = True
Application.Visible = True
Application.ScreenUpdating = True
Application.StatusBar = False
        MsgBox "Error:"& vbNewLine _& Err.Number & " - "& Err.Description _& vbCritical + vbOKOnlyExitSub

End Sub


Function AddMyNode(ByVal RootNode As SmartArtNode, ByVal NewNodeFlag AsBoolean, ByVal T As Task) As SmartArtNode'***********************************************************************************'Code is provided “AS IS” without warranty of any kind, either expressed or implied,'including but not limited to the implied warranties of merchantability and/or'fitness for a particular purpose.'***********************************************************************************Dim cT           As Task    'child tasksDim sProj        As Project 'potential inserted projectDim MyParentNode As SmartArtNodeSet MyParentNode = RootNode'Use Flag1 to decide if task is to be exportedIf T.Flag1 = c_TaskExportValue ThenIf NewNodeFlag ThenSet AddMyNode = RootNode.AddNode(msoSmartArtNodeBelow)ElseSet AddMyNode = RootNode.AddNode(msoSmartArtNodeAfter, msOrgChartLayoutBothHanging)EndIf

    AddMyNode.OrgChartLayout = msoOrgChartLayoutRightHanging

    If T.Summary ThenSet MyParentNode = AddMyNodeWith AddMyNodeSet AddMyNode = NodeContent(AddMyNode, T)EndWithIf T.Summary ThenIf T.Subproject <> ""Then
            FileOpen Name:=T.Subproject, ReadOnly:=TrueSet sProj = ActiveProjectSet T = sProj.ProjectSummaryTaskEndIfForEach cT In T.OutlineChildrenIf cT.Flag1 = c_TaskExportValue ThenSet AddMyNode = AddMyNode(MyParentNode, True, cT)EndIfNext cTIfNot sProj IsNothingThen
            FileClose pjDoNotSaveEndIfEndIfEndIfEndFunctionFunction NodeContent(ByVal CurrentNode As SmartArtNode, ByVal T As Task) As SmartArtNodeWith CurrentNode
        .TextFrame2.TextRange.ParagraphFormat.SpaceAfter = 1'Add required fields from task and format text'Use date format as defined in Project using Application.DefaultDateformat'or set Dateformat as listed in https://docs.microsoft.com/de-de/office/vba/api/project.pjdateformat
        .TextFrame2.TextRange.Text = T.OutlineNumber _& vbTab _& T.PercentComplete & " %" _& vbCrLf _& T.Name _& vbCrLf _& DateFormat(T.Start, Application.DefaultDateFormat) _& vbTab _& DateFormat(T.Finish, Application.DefaultDateFormat)
        .TextFrame2.TextRange.Font.Fill.ForeColor.RGB = vbBlack
        .TextFrame2.TextRange.Font.Size = 5With .Shapes
            .ShapeStyle = msoShapeStylePreset1
            .Line.ForeColor.RGB = 0 'vbBlack not working in WordWith .Item(1).Fill
                .Transparency = 0.5
                .TwoColorGradient msoGradientDiagonalUp, 1'https://msdn.microsoft.com/en-us/library/system.drawing.color.getbrightness(v=vs.110).aspx
                .GradientStops.Item(2).Color.Brightness = 1'https://msdn.microsoft.com/de-de/library/microsoft.office.interop.excel.colorformat.tintandshade%28v=office.15%29.aspx
                .GradientStops.Item(2).Color.TintAndShade = 0.5'set color depending on progress
                .GradientStops.Item(1).Position = (100 - T.PercentComplete) / 100
                .GradientStops.Item(2).Position = 1
                .GradientStops.Item(1).Transparency = 0
                .GradientStops.Item(2).Transparency = 0.7
                .GradientStops.Item(1).Color = vbWhite
                .GradientStops.Item(2).Color = vbBlack
                .GradientStops.Item(1).Color.Brightness = 0
                .GradientStops.Item(2).Color.Brightness = 0.8EndWithEndWithEndWithSet NodeContent = CurrentNodeEndFunction

Project: Benutzerdefinierte Felder in andere Entität kopieren / Copy Custom Fields to Other Entity

$
0
0
  1. Deutsch
  2. English
  3. Code
  4. Code ECF

Deutsch

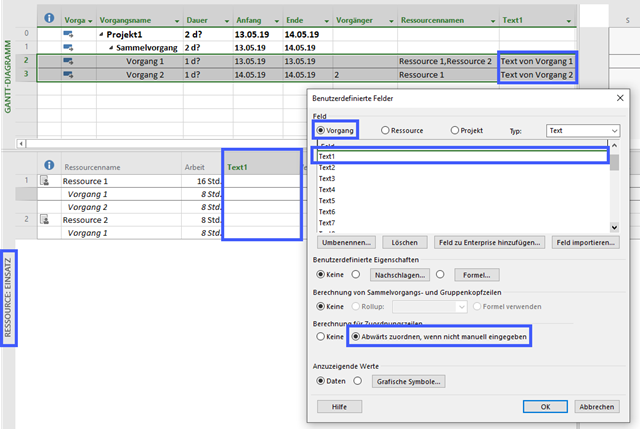
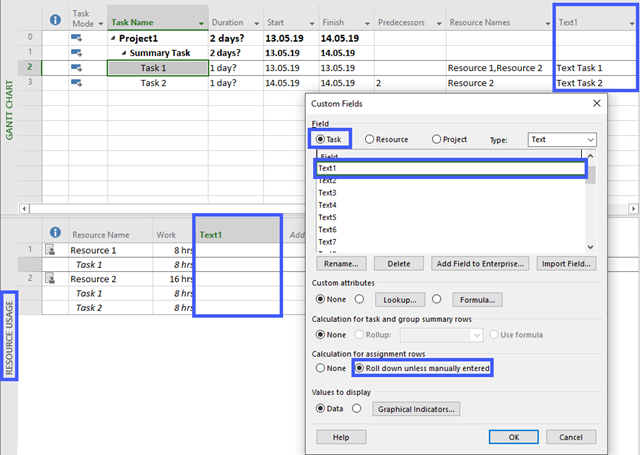
Häufig wird in Foren die Frage gestellt, weshalb Werte benutzerdefinierter Felder in einer Ansicht nicht zur Verfügung stehen. Das liegt üblicherweise daran, dass das Feld für eine Entität erstellt wurde, die in der gewünschten Ansicht nicht zur Verfügung steht. So kann es sich um ein Vorgangsfeld handeln, das in der Ansicht Ressource: Einsatz nicht angezeigt werden kann oder um ein Ressourcenfeld, das in der Ansicht Vorgang: Einsatz nicht verfügbar ist. Das ist auch dann der Fall, wenn die Berechnung für Zuordnungszeilen auf Abwärts zuordnen, wenn nicht manuell eingegeben aktiviert ist:

SNAGHTMLb01ce46

Die Feldwerte können jedoch per Makro für jede Zuordnung von einer Entität in die andere übertragen werden. Um die Werte lokaler Felder zu übertragen, können Sie den Code für lokale Felder einsetzen. Wenn Werte für Benutzerdefinierte Enterprise-Felder übertragen werden sollen, verwenden Sie den Code für diese Felder.
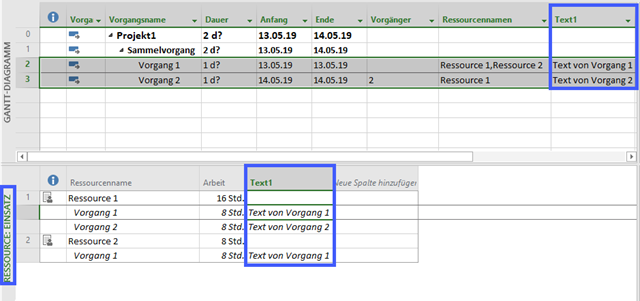
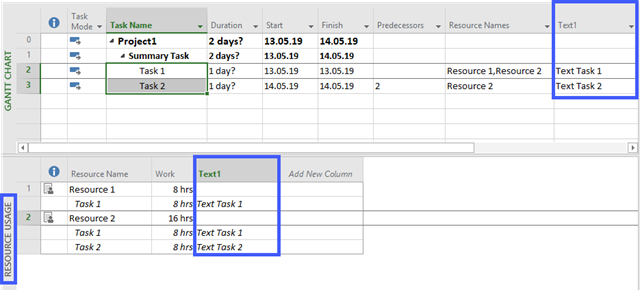
Nach Lauf des Makros stellt sich das Ganze dann so dar:

SNAGHTMLb04d481

In Makros implementieren / Implement Macros wird beschrieben, wie ein Makro in Project übernommen werden kann. Mehr Beispielmakros sind unter VBA zu finden.

English

There is often a question in forums why values of custom fields are not available in a specific view. This is usually because the field was created for an entity that is not available in the view you want. It can be an task field that can not be displayed in the Resource Usage view or a resource field that is not available in the Task Usage view. This is also the case if Calculation for assignment rows is set to Rolldown unless manually entered:

image

The field values can be transferred via macro for an assignment from one entity to another. To transfer the values of local fields, you can use the code for local fields. If values for Custom Enterprise fields are to be transmitted, use the code for these fields.

After running the macro, the project looks like this:

SNAGHTMLb1157d0

Implementing Macros / Implement Macros describes how to apply a macro to Project. More sample code is available at VBA.

Code

Sub CopyAssignmentFieldValueTaskToResource()'***********************************************************************************'Code is provided “AS IS” without warranty of any kind, either expressed or implied,'including but not limited to the implied warranties of merchantability and/or'fitness for a particular purpose.'***********************************************************************************'Copy assignment value from Task field "Text1" to Resource field "Text1"'Prerequisite: For both fields, "Roll down unless manually specified" has to be enabled'in Project - Custom FieldsDim P As ProjectDim T As TaskDim R As ResourceDim At As AssignmentDim Ar As Assignment'P is active ProjectSet P = ActiveProject'Loop through all tasksForEach T In P.Tasks'Ignore invalid tasks (empty rows)IfNot T IsNothingThen'Ignore summary tasks - no assignments should be thereIfNot T.Summary Then'Loop through all assignmentsForEach At In T.Assignments'Set R to resource of current assignmentSet R = P.Resources(At.ResourceID)'Set ResourceAssignment to current TaskAssignment'****** INFORMATION ******************'Unfortunatley there is an issue when UniqueIDs for assignments did'not match between TaskAssignment and ResourceAssignment. If there is'a fix in future enable "otion 1" instead of "option 2"'Start option 1 ****************************************************'                Set Ar = R.Assignments.UniqueID(At.UniqueID)'End option 1 ****************************************************'Start option 2 ****************************************************ForEach Ar In R.AssignmentsIf Ar.TaskID = T.ID Then'now we have the correct resource assignmentExitForEndIfNext Ar'End option 2 ****************************************************'Copy value
                Ar.Text1 = At.Text1Next AtEndIfEndIfNext TEndSubSub CopyAssignmentFieldValueResourceToTask()'***********************************************************************************'Code is provided “AS IS” without warranty of any kind, either expressed or implied,'including but not limited to the implied warranties of merchantability and/or'fitness for a particular purpose.'***********************************************************************************'Copy assignment value from Resource field "Text1" to Task field "Text1"'Prerequisite: For both fields, "Roll down unless manually specified" has to be enabled'in Project - Custom FieldsDim T As TaskDim R As ResourceDim At As AssignmentDim Ar As Assignment'P is active ProjectSet P = ActiveProject'Loop through all resourcesForEach R In P.Resources'Ignore invalid resourcesIfNot R IsNothingThen'Loop through all assignmentsForEach Ar In R.Assignments'Consider only assignments for current project (there may by other projects open with the same resources)If Ar.Project = P Then'Set task to current assignment taskSet T = P.Tasks(Ar.TaskID)'Set TaskAssignment to current ResourceAssignment'****** INFORMATION ******************'Unfortunatley there is an issue when UniqueIDs for assignments did'not match between TaskAssignment and ResourceAssignment. If there is'a fix in future enable "otion 1" instead of "option 2"'Start option 1 ****************************************************'                Set At = T.Assignments.UniqueID(Ar.UniqueID)'End option 1 ****************************************************'Start option 2 ****************************************************ForEach At In T.AssignmentsIf At.ResourceID = R.ID Then'now we have the correct task assignmentExitForEndIfNext At'End option 2 ****************************************************'Copy value
                At.Text1 = Ar.Text1EndIfNext ArEndIfNext REndSub

Code ECF

Sub CopyAssignmentFieldValueTaskToResource_ECF()'Copy assignment value from Resource field "MyResourceField" to Task field "MyTaskField" (in this sample)'Prerequisite:'   - For both fields, "Roll down unless manually specified" has to be enabled'   - Resource and Task field names must not contain any spaces (" ")Dim P As ProjectDim T As TaskDim R As ResourceDim At As AssignmentDim Ar As Assignment'P is active ProjectSet P = ActiveProject'Loop through all tasksForEach T In P.Tasks'Ignore invalid tasks (empty rows)IfNot T IsNothingThen'Ignore summary tasks - no assignments should be thereIfNot T.Summary Then'Loop through all assignmentsForEach At In T.Assignments'Set R to resource of current assignmentSet R = P.Resources(At.ResourceID)'Set ResourceAssignment to current TaskAssignment'****** INFORMATION ******************'Unfortunatley there is an issue when UniqueIDs for assignments did'not match between TaskAssignment and ResourceAssignment. If there is'a fix in future enable "otion 1" instead of "option 2"'Start option 1 ****************************************************'                Set Ar = R.Assignments.UniqueID(At.UniqueID)'End option 1 ****************************************************'Start option 2 ****************************************************ForEach Ar In R.AssignmentsIf Ar.TaskID = T.ID Then'now we have the correct resource assignmentExitForEndIfNext Ar'End option 2 ****************************************************'Copy value
                    Ar.MyResourceField = At.MyTaskFieldNext AtEndIfEndIfNext TEndSubSub CopyAssignmentFieldValueResourceToTask_ECF()'Copy assignment value from Task field "MyTaskField" to Resource field "MyResourceField" (in this sample)'Prerequisite:'   - For both fields, "Roll down unless manually specified" has to be enabled'   - Resource and Task field names must not contain any spaces (" ")Dim P As ProjectDim T As TaskDim R As ResourceDim At As AssignmentDim Ar As Assignment'P is active ProjectSet P = ActiveProject'Loop through all resourcesForEach R In P.Resources'Ignore invalid resourcesIfNot R IsNothingThen'Loop through all assignmentsForEach Ar In R.Assignments'Consider only assignments for current project (there may by other projects open with the same resources)If Ar.Project = P Then'Set task to current assignment taskSet T = P.Tasks(Ar.TaskID)'Set TaskAssignment to current ResourceAssignment'****** INFORMATION ******************'Unfortunatley there is an issue when UniqueIDs for assignments did'not match between TaskAssignment and ResourceAssignment. If there is'a fix in future enable "otion 1" instead of "option 2"'Start option 1 ****************************************************'                Set At = T.Assignments.UniqueID(Ar.UniqueID)'End option 1 ****************************************************'Start option 2 ****************************************************ForEach At In T.AssignmentsIf At.ResourceID = R.ID Then'now we have the correct resource assignmentExitForEndIfNext At'End option 2 ****************************************************'Copy value
                    At.MyTaskField = Ar.MyResourceFieldEndIfNext ArEndIfNext REndSub

Project Online / Project Server: Lesen und Schreiben von Benutzerdefinierte Enterprise-Feldern / Read and Write Enterprise Custom Fields

$
0
0
  1. Deutsch
  2. English
  3. Code

Deutsch

Häufig sollen Werte für Benutzerdefinierte Enterprise-Felder (ECF) per Makro (VBA) gelesen oder gesetzt werden. Dazu ist jeweils im ersten Schritt die ID des ECF zu identifizieren, dafür steht die Funktion FieldNameToFieldConstant zur Verfügung. Als Parameter benötigt diese Funktion den Feldnamen und die Entität des Felds. Mit der erhaltenen Konstanten können dann die Werte mit der Funktion GetField gelesen oder mit der Funktion SetField gesetzt werden. Im Codebereich finden Sie Beispiele für alle Entitäten. Bitte beachten Sie Folgendes:

  • Für den Zugriff auf Felder auf der Zuordnungsebene sind die Funktionen GetField und SetField nicht implementiert. Hier erfolgt der Zugriff direkt über den Feldnamen. Das ist nur möglich, wenn die Feldnamen keine Leerzeichen enthalten. Bitte berücksichtigen Sie das schon bei der Anlage von Feldern für die Entitäten Vorgang und Ressource.
  • Bitte aktivieren Sie bei der Felddefinition “Abwärts zuordnen, wenn nicht manuell angegeben”. Für Project Online ist das aktuell nicht erforderlich, doch ich vermute hier eine Änderung in der nahem Zukunft.
  • Werte für Attributfelder müssen mit den in Project angezeigten Werten erfolgen. In deutschsprachigem Projekt ist also “Ja” und “Nein” zu setzen. Da der zu setzende Wert oft als Boolean vorliegt oder ein vorhandener Wert als Boolean benötigt wird, enthält der Code auch zwei Funktionen, die Bool ind Text übersetzen bzw. umgekehrt.

In Makros implementieren / Implement Macros wird beschrieben, wie ein Makro in Project übernommen werden kann. Mehr Beispielmakros sind unter VBA zu finden.

English

Often values ​​for Enterprise Custom Fields (ECF) are to be read or set by macro (VBA). For this, the ID of the ECF is to be identified in the first step, using function FieldNameToFieldConstant. As a parameter, this function requires the field name and the entity of the field. The retrieved constants can be used to read the values ​​with the GetField function or set them using the SetField function. The code section below contains samples for all entities. Please note the following:

  • To access fields on assignment level, the GetField and SetField functions are not implemented. In this case, access to fields has to be done directly using field name. This is only possible if the field names do not contain any spaces. Please take this into account when creating fields for the entities Task and Resource.
  • Please activate the field definition "Roll down down, unless manually specified". For Project Online, this is currently not required, but I suspect a change in the near future.
  • Values ​​for fields of type Flag must be set using the values ​​displayed in Project. In English Project you need to set  "Yes" and "No". Since the value to be set is often available as Boolean, or an existing value is needed as a Boolean, the code also includes two functions that translate Bool to text or vice versa.

Implementing Macros / Implement Macros describes how to apply a macro to Project. More sample code is available at VBA.

Code

Sub ReadWriteECF()'***********************************************************************************'Code is provided “AS IS” without warranty of any kind, either expressed or implied,'including but not limited to the implied warranties of merchantability and/or'fitness for a particular purpose.'***********************************************************************************Dim v_ProjectField_ID AsDoubleDim v_ProjectFieldFlag_ID AsDoubleDim v_TaskField_ID AsDoubleDim v_TaskFieldFlag_ID AsDoubleDim v_ResourceField_ID AsDoubleDim v_ResourceFieldFlag_ID AsDoubleDim v_str AsStringDim v_bool AsBooleanDim P As ProjectDim T As TaskDim R As ResourceDim A As Assignment'This code provides a simple sample to read/write Enterprise Custom fields for all entities'Read **********************************************************************************'Project **********************************************************************************Set P = ActiveProject
            v_ProjectField_ID = Application.FieldNameToFieldConstant("MyProjectField", pjProject)'Flag fields have to be handled in a different way, therefore another variable
            v_ProjectFieldFlag_ID = Application.FieldNameToFieldConstant("MyProjectFieldFlag", pjProject)'Get value for any type - values of flag fields will be provided as text in your language
            v_str = P.ProjectSummaryTask.GetField(v_ProjectField_ID)'Flag field - get result as text
            v_str = P.ProjectSummaryTask.GetField(v_ProjectFieldFlag_ID)'Flag field - get result as boolean using function TextToBool
            v_bool = TextToBool(P.ProjectSummaryTask.GetField(v_ProjectFieldFlag_ID))'Resource **********************************************************************************'For sample purposes, set R to first resource if existsIf P.Resources.Count > 0 ThenSet R = P.Resources(1)
                v_ResourceField_ID = Application.FieldNameToFieldConstant("MyResourceField", pjResource)'Flag fields have to be handled in a different way, therefore another variable
                v_ResourceFieldFlag_ID = Application.FieldNameToFieldConstant("MyResourceFieldFlag", pjResource)'Get value for any type - values of flag fields will be provided as text in your language
                v_str = R.GetField(v_ResourceField_ID)'Flag field - get result as text
                v_str = R.GetField(v_ResourceFieldFlag_ID)'Flag field - get result as boolean using function TextToBool
                v_bool = TextToBool(R.GetField(v_ResourceFieldFlag_ID))EndIf'Task **********************************************************************************'For sample purposes, set R to first Task if existsIf P.Tasks.Count > 0 ThenSet T = P.Tasks(1)
                v_TaskField_ID = Application.FieldNameToFieldConstant("MyTaskField", pjTask)'Flag fields have to be handled in a different way, therefore another variable
                v_TaskFieldFlag_ID = Application.FieldNameToFieldConstant("MyTaskFieldFlag", pjTask)'Get value for any type - values of flag fields will be provided as text in your language
                v_str = T.GetField(v_TaskField_ID)'Flag field - get result as text
                v_str = T.GetField(v_TaskFieldFlag_ID)'Flag field - get result as boolean using function TextToBool
                v_bool = TextToBool(T.GetField(v_TaskFieldFlag_ID))EndIf'Assignment, get Resource field value ***********************************************'For assignments, we cannot use "GetField". Field values on assignment level can only'be accessed directly. This is only possible if field name does not contain spaces!!!!'For sample purposes, set A to first Assignment of first Resource if existsIf P.Resources.Count > 0 ThenSet R = P.Resources(1)If R.Assignments.Count > 0 ThenSet A = R.Assignments(1)'Get value for any type - values of flag fields will be provided as text in your language
                    v_str = A.MyResourceField'Flag field - get result as text
                    v_str = A.MyResourceFieldFlag'Flag field - get result as boolean using function TextToBool
                    v_bool = TextToBool(A.MyResourceFieldFlag)EndIfEndIf'Assignment, get Task field value ***********************************************'For assignments, we cannot use "GetField". Field values on assignment level can only'be accessed directly. This is only possible if field name does not contain spaces!!!!'For sample purposes, set A to first Assignment of first task if existsIf P.Tasks.Count > 0 ThenSet T = P.Tasks(1)If T.Assignments.Count > 0 ThenSet A = T.Assignments(1)'Get value for any type - values of flag fields will be provided as text in your language
                    v_str = A.MyTaskField'Flag field - get result as text
                    v_str = A.MyTaskFieldFlag'Flag field - get result as boolean using function TextToBool
                    v_bool = TextToBool(A.MyTaskFieldFlag)EndIfEndIf'Write **********************************************************************************'Project **********************************************************************************Set P = ActiveProject
            v_ProjectField_ID = Application.FieldNameToFieldConstant("MyProjectField", pjProject)'Flag fields have to be handled in a different way, therefore another variable
            v_ProjectFieldFlag_ID = Application.FieldNameToFieldConstant("MyProjectFieldFlag", pjProject)'Set value for any type - values of flag fields have to be provided as text in your language
            P.ProjectSummaryTask.SetField FieldID:=v_ProjectField_ID, Value:="Some Text or number or date - depending on type"'Flag field - value has to be set as text, using function BoolToText
            P.ProjectSummaryTask.SetField FieldID:=v_ProjectFieldFlag_ID, Value:=BoolToText(True)'Resource **********************************************************************************'For sample purposes, set R to first resource if existsIf P.Resources.Count > 0 ThenSet R = P.Resources(1)
                v_ResourceField_ID = Application.FieldNameToFieldConstant("MyResourceField", pjResource)'Flag fields have to be handled in a different way, therefore another variable
                v_ResourceFieldFlag_ID = Application.FieldNameToFieldConstant("MyResourceFieldFlag", pjResource)'Set value for any type - values of flag fields have to be provided as text in your language
                R.SetField FieldID:=v_ResourceField_ID, Value:="Some Text or number or date - depending on type"'Flag field - value has to be set as text, using function BoolToText
                R.SetField FieldID:=v_ResourceFieldFlag_ID, Value:=BoolToText(True)EndIf'Task **********************************************************************************'For sample purposes, set T to first Task if existsIf P.Tasks.Count > 0 ThenSet T = P.Tasks(1)
                v_TaskField_ID = Application.FieldNameToFieldConstant("MyTaskField", pjTask)'Flag fields have to be handled in a different way, therefore another variable
                v_TaskFieldFlag_ID = Application.FieldNameToFieldConstant("MyTaskFieldFlag", pjTask)'Set value for any type - values of flag fields have to be provided as text in your language
                T.SetField FieldID:=v_TaskField_ID, Value:="Some Text or number or date - depending on type"'Flag field - value has to be set as text, using function BoolToText
                T.SetField FieldID:=v_TaskFieldFlag_ID, Value:=BoolToText(True)EndIf'Assignment, set Resource field value ***********************************************'For assignments, we cannot use "GetField". Field values on assignment level can only'be accessed directly. This is only possible if field name does not contain spaces!!!!'For sample purposes, set A to first Assignment of first Resource if existsIf P.Resources.Count > 0 ThenSet R = P.Resources(1)If R.Assignments.Count > 0 ThenSet A = R.Assignments(1)'Get value for any type - values of flag fields will be provided as text in your language
                    A.MyResourceField = "Some Text or number or date - depending on type"'Flag field - value has to be set as text, using function BoolToText
                    A.MyResourceFieldFlag = BoolToText(True)EndIfEndIf'Assignment, set Task field value ***********************************************'For assignments, we cannot use "GetField". Field values on assignment level can only'be accessed directly. This is only possible if field name does not contain spaces!!!!'For sample purposes, set A to first Assignment of first task if existsIf P.Tasks.Count > 0 ThenSet T = P.Tasks(1)If T.Assignments.Count > 0 ThenSet A = T.Assignments(1)'Get value for any type - values of flag fields will be provided as text in your language
                    A.MyTaskField = "Some Text or number or date - depending on type"'Flag field - value has to be set as text, using function BoolToText
                    A.MyTaskFieldFlag = BoolToText(True)EndIfEndIfEndSubFunction TextToBool(ByVal boolExpression AsVariant) AsBoolean'In Project values for flag fields are only available as Yes/No in your language'This function transforms values to boolean
        boolExpression = LCase(boolExpression)SelectCase LCase(boolExpression)CaseTrue, "ja", "yes", "oui", "si"
                TextToBool = TrueCaseFalse, "nein", "no", "nee", ""'empty values as false
                TextToBool = FalseCaseElseDim Msg AsString
                Msg = "MyBool: cannot translate expression of "& boolExpression
                Err.Raise MsgEndSelectEndFunctionFunction BoolToText(ByVal boolExpression AsBoolean) AsString'In Project values for flag fields are only available as Yes/No in your language'This function transforms boolean to text valueSelectCase Application.LocaleIDCase"1033"'EnglishIf boolExpression Then
                        BoolToText = "Yes"Else
                        BoolToText = "No"EndIfCase"1031"'GermanIf boolExpression Then
                        BoolToText = "Ja"Else
                        BoolToText = "Nein"EndIfCase"1036"'FrenchIf boolExpression Then
                        BoolToText = "Oui"Else
                        BoolToText = "Non"EndIfCase"1043"'DutchIf boolExpression Then
                        BoolToText = "Ja"Else
                        BoolToText = "Nee"EndIfCaseElseDim Msg AsString
                    Msg = "MyBool: cannot translate expression of "& boolExpression
                    Err.Raise MsgEndSelectEndFunction

Enjoyed SharePoint Conference 2019

$
0
0

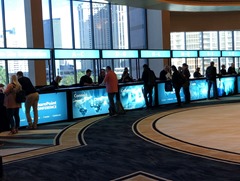
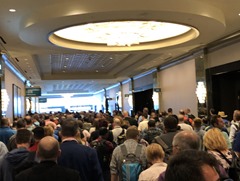
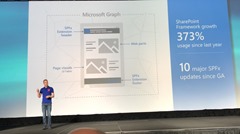
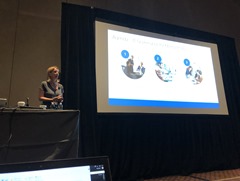
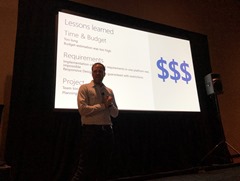
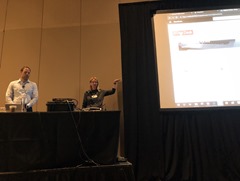
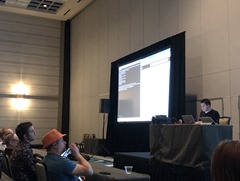
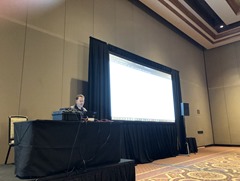
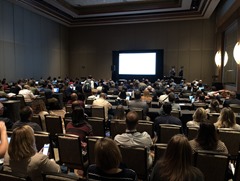
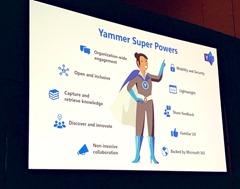
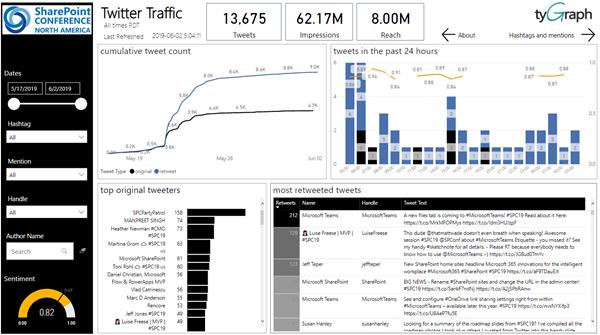
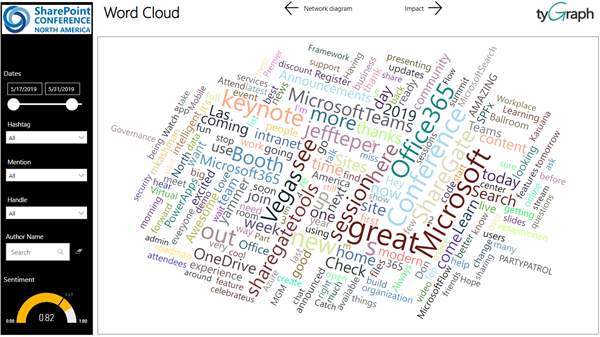
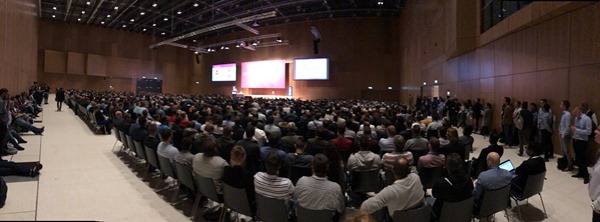
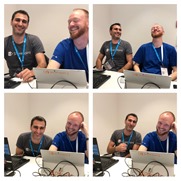
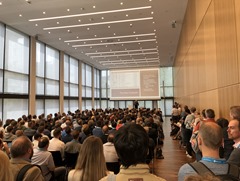
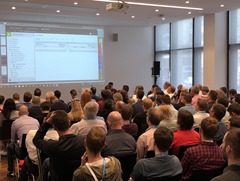
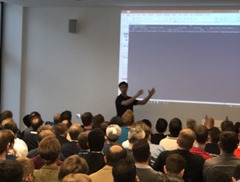
Last week, the SharePoint Conference returned to Las Vegas! #SPC19 took place from May 21 - 23, 2019 at the brand-new MGM Grand conference center, Las Vegas, Nevada. The event informed about the latest news in SharePoint, OneDrive, Yammer, Microsoft 365 and Azure. We from atwork were proud to deliver a full day workshop about Security and Governance in Microsoft 365 and some sessions. See some impressions of SPC19 here!

image
image

As in the last year, at the first "reborn" SharePoint Conference in Vegas, SPC19 was organized by SharePoint Conference with Microsoft as a Diamond sponsor. Jeff Teper, Corporate Microsoft Vice President Office 365, SharePoint, OneDrive and Stream, and his team delivered the SPC keynote about "The intelligent workplace". You can watch it on demand at the SharePoint Virtual Summit site at aka.ms/spc/summit.

image

SharePoint Virtual Summit - Catch up on all of the news and announcements from the 2019 SharePoint Virtual Summit.

image

Many Microsoft Program Managers delivered sessions about the latest news and features of their products, such as SharePoint, OneDrive, Yammer and Microsoft 365, so attendees got all information first-hand. See the full schedule at sessions. As in the last year, we from atwork were proud to be part of #SPC19 and we delivered these sessions:

  • Full day workshop: IT Governance for Microsoft 365 - Martina Grom
  • BRK118: Why Yammer is still the universe to me - Martina Grom
  • BRK051: How Yammer security and management works behind the scenes in a GDPR world - Martina Grom
  • BRK084: Real world: from fragmented services to a modern intranet – customer story of Klöckner - Martina Grom and Marc Grewe
  • BRK078: Office 365 Groups and Microsoft Teams PowerShell Master Class - Martina Grom and Toni Pohl
  • BRK088: Send data to Outlook, Teams and Bots with Adaptive Cards - Toni Pohl

See some snapshots from around the conference here, and we enjoyed the Gin Blossoms concert at SPC!

20190521_014629335_iOS 20190519_145613792_iOS 20190519_233406184_iOS sprunners1 20190521_153804596_iOS 20190521_154032468_iOS 20190521_171822341_iOS 20190521_165802239_iOS 20190521_161626034_iOS 20190521_172855556_iOS 20190521_174255639_iOS 20190521_182306154_iOS 20190522_225830561_iOS 20190523_040202399_iOS 20190523_043155196_iOS 20190521_231240532_iOS 20190520_192237442_iOS 20190519_160938944_iOS 20190521_220754193_iOS 20190522_185606378_iOS 20190522_190746821_iOS 20190521_222013730_iOS 20190523_154629915_iOS 20190522_232424434_iOS 20190521_182331093_iOS 20190522_003251764_iOS 20190522_003423371_iOS 20190522_223356013_iOS 20190523_192255141_iOS 20190520_181419720_iOS 61506169_10157514181889434_7265083106992848896_n 20190521_235646152_iOS 60819714_10156388380653861_7974991765948071936_n sprunners2

Following the Twitter hashtag #SPC19, our friends from TyGraph created (as in the previous years) an interactive Power BI dashboard to visualize the event feedback. See it at link.tygraph.com/SPC19

image

The most used hashtags at #SPC19 were #Microsoft, #MicrosoftTeams, #Office365 and #Vegas and Twitter user names as @jeffteper and @vesajuvonen.

image

It was great to be part of the #SPC19 conference!

image

#SPC20 is already announced and will take place May 19 - 21, 2020, again in MGM Grand, Las Vegas.

The registration opens on June 3rd. Save the date and CU there!

This was European Collaboration Summit 2019

$
0
0

The European Collaboration Summit (ECS), also known as #collabsummit, is the largest community-driven conference in the world with a focus on modern workplace technologies and digital transformation. Experts from around the world informed about topics such as Microsoft 365, Azure, SharePoint, AWS, business apps and more. We were happy to be part of that great event in May 2019 in Wiesbaden, Germany. See some impressions here.

ECS took place from Monday, 27 May to Wednesday, 29 May 2019 at the Rhein Main Congress Center (RMCC) in Wiesbaden, Germany. On Monday, the workshops started for more than 800 attendees, followed by two full conference days with more than 2,000 attendees. Wow! See this amazing photo(s and the cool closing video) from Aleksandar Draskovic– thx!

20190531_084610620_iOS

On Tuesday, after the opening of Adis Jugo and Matthias Einig (Masterminds and part of the ECS organization team), the "Digital Transformation" keynote started  with Sharon Cooper (The Economist Intelligence Unit) and an overview keynote of Microsoft Office 365, SharePoint and OneDrive keynote by Dan Holme (Microsoft , Director of Product Marketing, SharePoint and Yammer). See the full agenda at collabsummit.eu/agenda, the Collabsummit app and some snapshots here.

20190528_071151837_iOS

20190528_071234722_iOS 20190528_071853645_iOS 20190528_073534349_iOS 20190528_083503629_iOS  20190528_114256687_iOS 20190528_094700647_iOS 20190528_132900173_iOS 20190528_133122453_iOS image

The speaker lineup was amazing (photos taken from the website), and all the speakers have taken their time off to support the community.

image

We from atwork were proud to be part of ECS and Martina Grom supported as member of the content board to select cool sessions. We delivered these sessions (see all at Agenda):

  • How Yammer security and management works behind the scenes in a GDPR world - Martina Grom
  • Develop intelligent apps for the Modern Workplace – Toni Pohl
  • Password-less authentication in AD FS 2019 - Dominik Hoefling

On Twitter, our friends from TyGraph created (as in the previous years), an interactive Power BI dashboard to visualize the event feedback. See it at Twitter Traffic by TyGraph.

image

The most used hashtags at #collabsummit were #communityrocks, #sharepoint and #session, followed by #Office365 and #Wiesbaden and Twitter user names.

image

We had a blast (as at every ECS and at the predecessor conferences in Zagreb in the past years) and I guess, everyone there had a great time!

image

Many thanks to the ECS organization team and the many helping hands, the partners and sponsors, the speakers and to all attendees, who made this event a very special and successful one!

#collabsummit will return next year, from June, 8 to 10th, 2020 again in Wiesbaden. Save the date and CU there!

Hello, PowerApps Portals (and external users)!

$
0
0

PowerApps are a great way to develop low-code apps for various platforms. With the big success of PowerApps and Flow, the number one request of many customers was: How can people outside my company use PowerApps? Well, soon there will be a way with PowerApps Portals!

So far, using a PowerApp requires a login in the organization´s tenant. In real scenarios, there are of course many use cases in which the provision of a PowerApp for customers, partners, suppliers, etc. makes sense. So, there´s a huge demand for sharing PowerApps with external users.

As Charles Lamanna, General Manager of PowerApps at Microsoft, writes in the PowerApps blog, there will be a new way to distribute an app with PowerApps Portals: "Today we’re excited to announce PowerApps Portals, the ability to build low-code, responsive websites which allow external users to interact with the data stored in the Common Data Service."

See the article at Introducing PowerApps Portals: powerful low-code websites for external users with the following demo screenshot.

image

"Starting in next month, you’ll be able to create a new App type called "Portal" directly from PowerApps. Using a simple, dedicated designer experience, makers can create pixel-perfect websites which are custom branded and allow users to interact with data stored in the Common Data Service."

The article informs that PowerApps Portals will be available as a Public Preview in July. Interested parties can already subscribe to be informed about the Public Preview availability (currently the list of the countries does not include all countries…).

So, we are looking forward to see PowerApps Portals and the new capabilities in the next months!


Celebrating EuroPride 2019 in Vienna

$
0
0

At atwork, diversity and inclusion are in our daily life. Everyone should be treated equally and with respect. These are the foundations of our modern society. This year, Euro Pride takes place in our home town Vienna. We want to show our sympathy by adapting our atwork logo on the website and in our blog to the rainbow colors. We support pride and the LGBTIQ community with the motto "Join us. March with us. Together & Proud."

atwork-logo-pride

The rainbow-colored atwork emblem will be our logo in June at www.atwork-it.com and at blog.atwork.at.

image

image

Even in 2019, we see how our society and politics treat people for reasons of different races or cultures, according to social class, by gender, by sexual orientation, or with disabilities. That needs to change. We think it is important to raise awareness on this issue, as basic ideas such as human rights and tolerance are cornerstones of our society. Therefore, as a human being and as an organization, we want to support the motto of Pride.

Find out more about the European Pride event at europride2019.at.

image

Enjoy summertime in Vienna and support the community at EuroPride Village and the EuroPride Parade!

New Rainbow Themes are available in your Office 365 Tenant

$
0
0

All of you who sign in to their Office 365 Home site will see three new Themes available now, considered the Rainbow Themes! One Style is a Unicorn style. So right in Pride month you get LoveIsLove Themes in Office 365 as well!

To change the look of your environment, simply click on the gear icon in the upper right corner. If you do not see it, custom themes are disabled by your administrator in your tenant.

image

image

image

image

So – activate your Unicorn in Office 365!

Develop Intelligent Apps for the Modern Workplace interview at ECS 2019

$
0
0

End of May the European Collaboration Summit 2019 took place in Germany. My MVP colleague Michael Greth (see also sharepointsendung.de) did a short interview with me about Microsoft Graph and my session "Develop Intelligent Apps for the Modern Workplace". Watch it here.

The interview is about Microsoft Graph and the use of Adaptive Cards and is in German. Watch the 6 minute talk on LinkedIn at Linkedin.com: ECS 2019 - Community Talk mit Toni Pohl über Microsoft Graph und Adaptive Cards

image

…or at YouTube: ECS 2019 - Community Talk mit Toni Pohl über Microsoft Graph und Adaptive Cards.

It was a pleasure, many thanks, Michael!

Insider Dev Tour 2019 Vienna

$
0
0

Yesterday, the Insider Dev Tour 2019 took place in our home town Vienna, organized from the community for the community. About 60 attendees joined us at this beautiful summer day in the Microsoft Office in Vienna.

image

See some snapshots from the #InsiderDevTour event in our Sway here.

Many thanks to the team and to Gerwald Oberleitner, Martina Grom, Thomy Gölles, Christoph Wille, Stefan Bauer, Martin A. Ullrich, Shehata Haroun, Andi Pollak, Christian Nagel and Christian Waha, Bernadette Welly and Georg Binder! Our special thanks to Gerwald Oberleitner from Microsoft for delivering the keynote and to our colleague Martin A. Ullrich for the organization support and for jumping in into the 2nd session!

We hope everybody had a great time and the latest Build content is useful for your apps!

Update your Azure CLI with Choco

$
0
0

I use Azure CLI from time to time. So, it´s a good idea to update that module…

For example, I use Azure CLI for renewing SPN´s a described at How to create or renew Service Principal Names in Azure Active Directory.

When I checked the latest version with az --version, I saw my outdated version: "You have 52 updates available. Consider updating your CLI installation." So, the best method is to use Chocolatey - The package manager for Windows in an elevated command prompt as described at Azure CLI. To make it short: Simply run choco upgrade azure-cli.

.image

The current version of Azure CLI is 2.0.67. "Downloading azure-cli from 'https://azurecliprod.blob.core.windows.net/msi/azure-cli-2.0.67.msi' (46.8 MB)". By default, you can see the choco log files at C:\ProgramData\chocolatey\logs\chocolatey.log.

Happy upgrading!

Viewing all 1153 articles
Browse latest View live