Storing credentials, SSL certificates, connection strings and other secrets in Azure Key Vault is recommended for every software project in the (Azure) cloud. This is easy to do when using certificates, such as for a website hosted in Azure App Services. Learn how to configure a SSL certificate once and then have it automatically updated when you update it in the Key Vault, called automatic rotation. See a step-by-step description here.
In this article we use a website and an old and a new custom SSL wildcard certificate. We would like to add SSL to our website (or to many websites) with our certificates. To see more about this topic in the Microsoft documentation, see the documentation at SSL termination with Key Vault certificates. Here´s our How-To scenario with a sample.
Create an Azure Key Vault
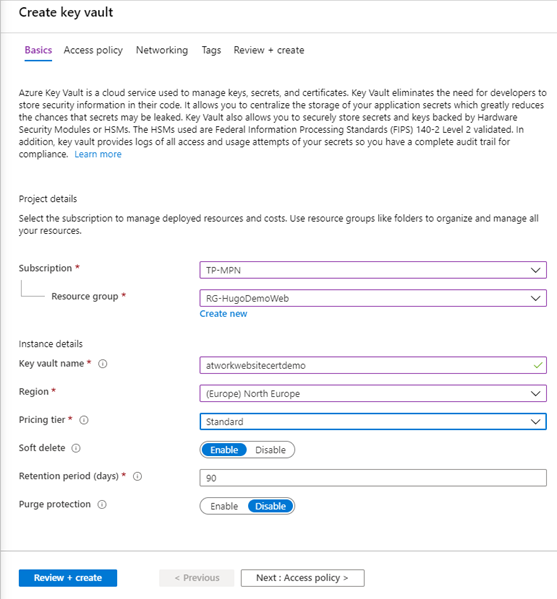
The Key Vault is our store for secrets and SSL certificates. We can create that resource in the Azure portal. To create the resource, we select the usual subscription, the resource group, key vault name, region, pricing tier, options and click Review + create as follows.
Once the deployment of the Key Vault is complete, let´s upload the certificate.
Upload the certificate
We need the certificate as pfx file. The pfx file contains the public key file, the SSL certificate file, and the associated private key file. To generate a CSR (certificate signing request) and to generate the pfx file from a cer file, we can use tools such as Open SSL or similar as described here. Once you have generated or downloaded the pfx file and the password, we can upload that certificate to the Azure Key Vault.
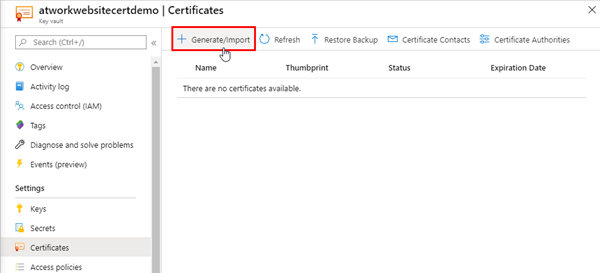
In the Key Vault, we open Certificates and click Generate/Import.
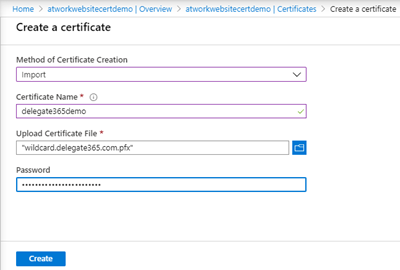
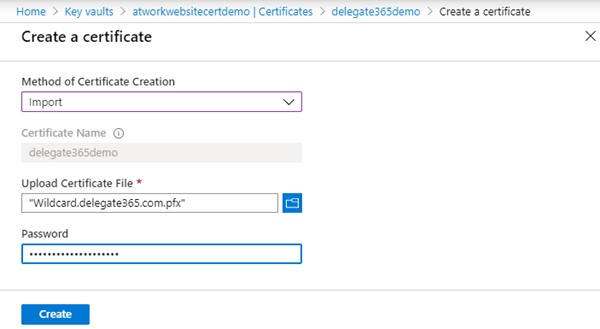
We already have a custom certificate. So, we select Import and enter a certificate name, and we upload the pfx file and the password and click Create as here.
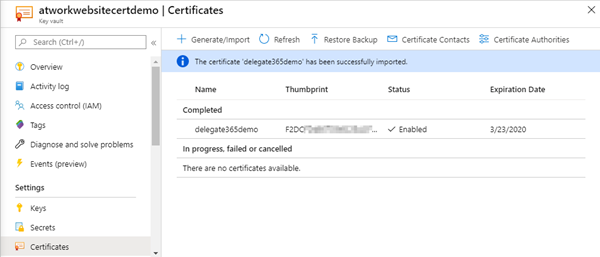
After the successful import we see the certificate in the list with it´s thumbprint, status, and the expiration date.
Add a system assigned managed identity in the App service
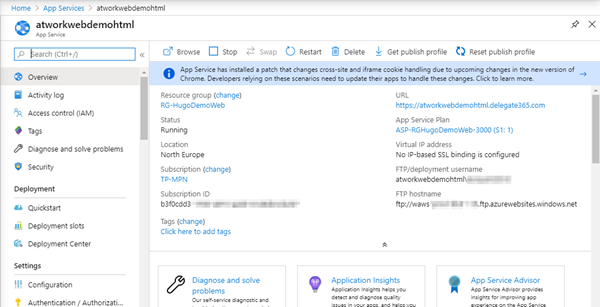
Then, we navigate to the website. In this sample, this is a generated HTML website that shall use our custom domain and our certificate.
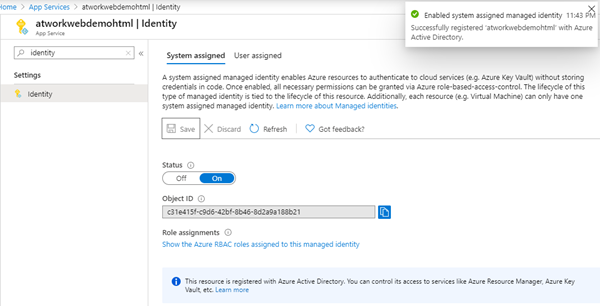
In the App Service menu we select the Identity. Here, we switch the Status of the System assigned managed identity to On and click Save.
When done, we see the Object ID of the system assigned identity. Here, it´s c31e… we will use that later.
Add an access policy
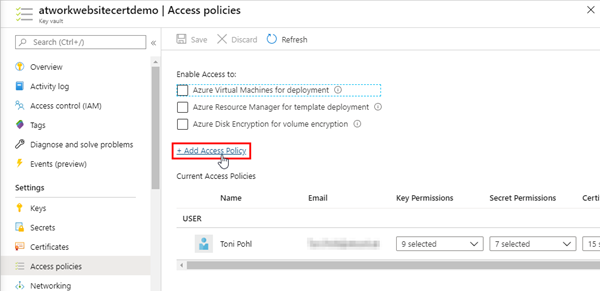
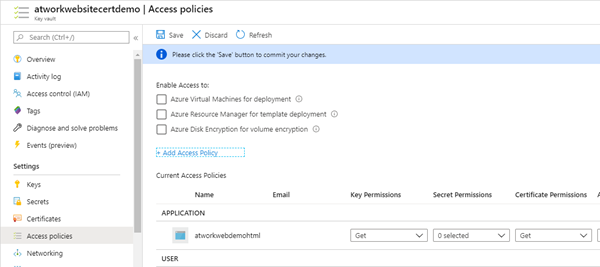
Back to the Azure Key Vault. We can define the rules for the access in the Access policies. By default, the current user is owner and has all permissions. We open the Add Access Policy link as here.
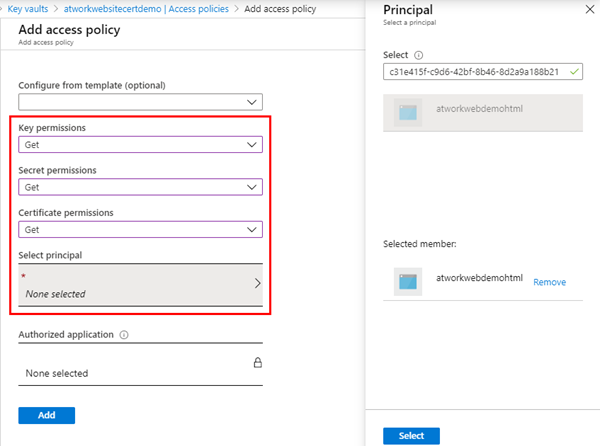
Here, we search with the Object ID and should find the website MSI. We select it in the Principal panel and click Select. As key permissions, we choose Get and Certificate permissions are set to Get. Also, for reading purposes of the website, we can select Get permissions for secrets as well if needed. Then we´re done and click the Add button.
The assigned identity will be shown with it´s permissions in the Key Vault, as here.
The certificate can be used now from entitled apps. Now, let´s add the domain to the website. See Grant your app access to Key Vault for details.
Create a A-record or a CName pointing to the App Service
To point a domain to our website, we use the the DNS panel of our domain provider, analogously as here. A CNAME record is added to the DNS zone, pointing to our Azure website.
So, that domain points to our azurewebsite.net. Depending on the name servers, this should be available in the next minutes or the next hour (1 hour TTL).
Add the custom domain to the App Service
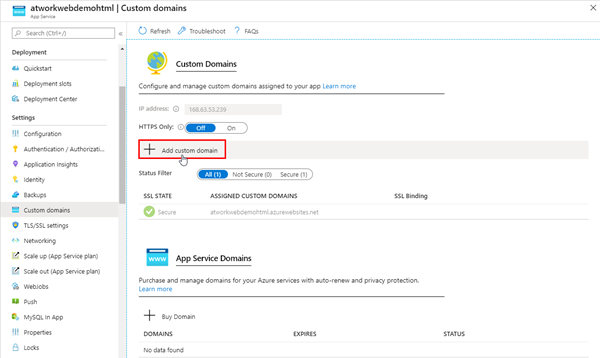
In the Azure portal, we add the custom domain by clicking the link.
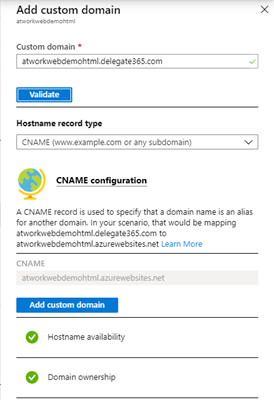
We enter the domain name and click Validate.
After the validation, we can Add the custom domain to our website binding. Our website can now be opened with http://mydomain. Just, the certificate is missing.
Deploy the certificate to an App Service
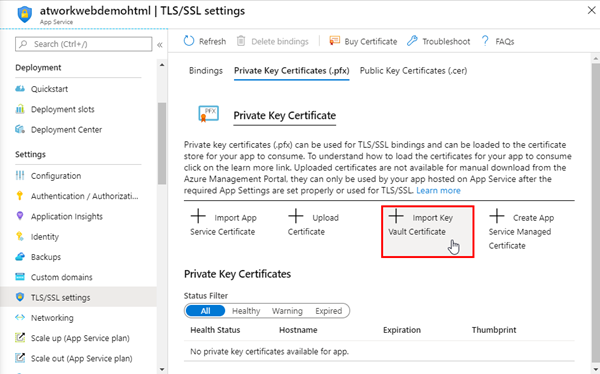
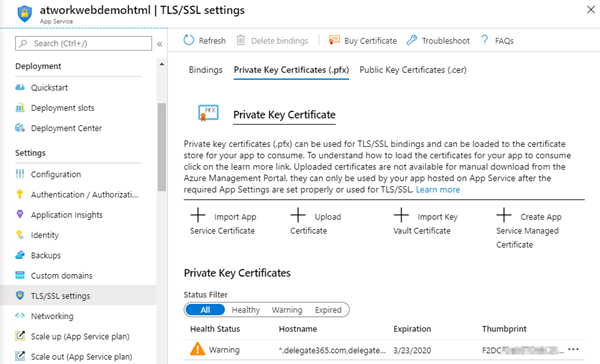
To assign a certificate, the pfx must be imported in the App Service TLS/SSL settings. We open the Import Key Vault Certificate here.
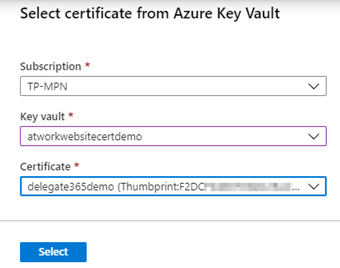
In the side panel, we select the Subscription, the Key Vault and the stored certificate and click Select.
We confirm with the Select button when done. After the import, the certificate is added to the App Service Plan. From my point of view, the link Import Key Vault Certificate is a little bit misleading since there´s a connection to the Key Vault that allows to use a newer version of the certificate automatically and it´s not only a one time operation. Anyway, here we go.
In this sample, we have uploaded a certificate that is about to expire soon. Azure detects that and informs with a Warning symbol. We will take care of that later.
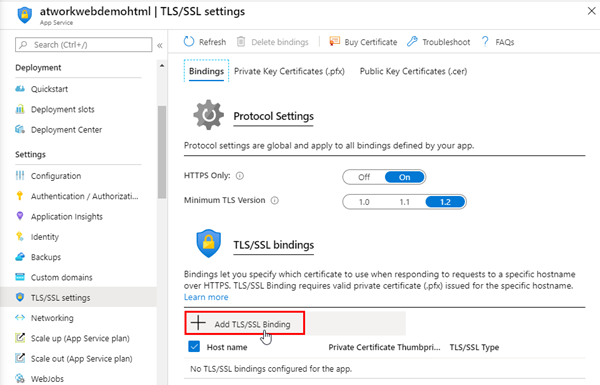
We have to add the binding to the certificate now. Back in the Bindings section, we open the Add TLS/SSL Binding.
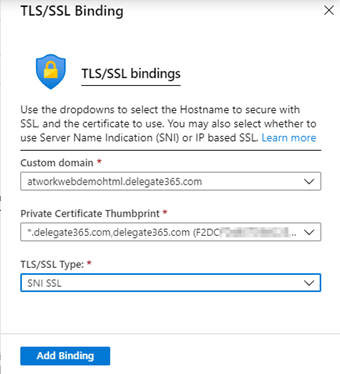
So we can select the domain, the certificate and the TLS/SSL Type SNI SSL. SNI SSL The type Server Name Indication allows that multiple website can be accessed together and can switch domains and share a server on TLS port 443, even if only one IP address is available (multiple domains per server IP address).
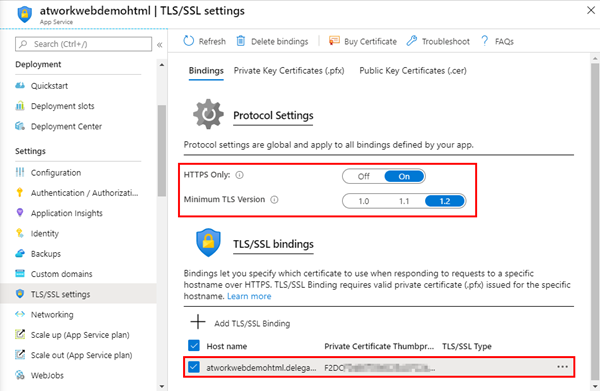
After clicking Add Binding, the App Service settings are saved. You should also select HTTPS Only On and TLS 1.2 as here.
Done.
Check the result with HTTPS
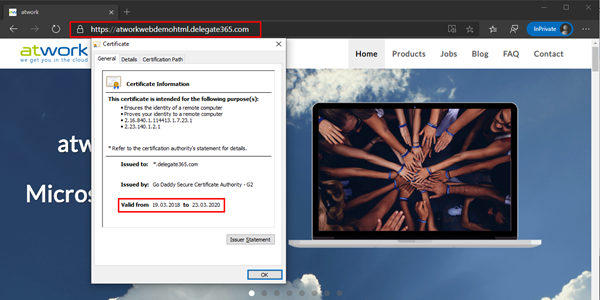
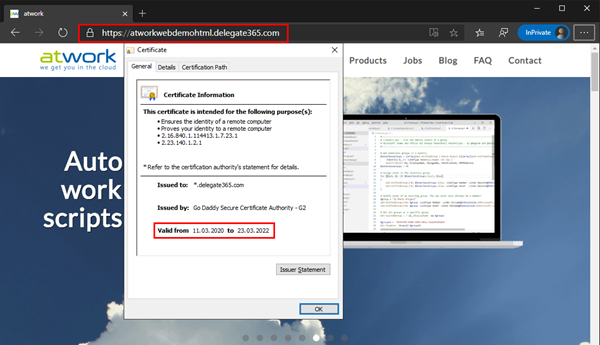
When opening the website with HTTPS, you will see the website using the certificate. The browser can show the certificate details. Here we go.
So, this worked perfectly.
But wait. The certificate is going to expire soon!
Renew the certificate
Since the certificate must be renewed, we can now use our Key Vault. First, organize a new certificate. We already did that and have a new pfx with a password. The new certificate is valid till 2022.
In the Key Vault, we generate a New Version of the certificate.
Again, we import the new pfx with it´s password.
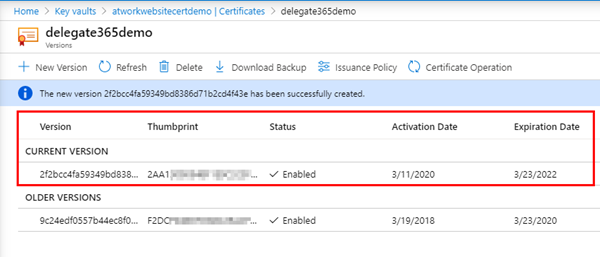
So now we have a new version of the certificate deployed. The old had a thumbprint F2DC. The new one´s thumbprint is starting with 2AA1 and it´s valid for two more years.
Cleanup App Service Plans and certificates
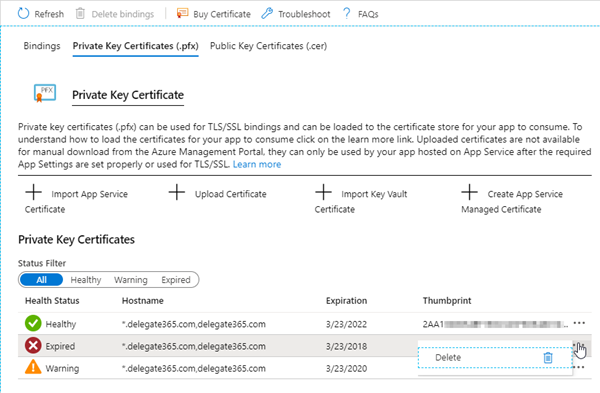
Just to mention. When managing (manually assigned) certificates in App Services, it´s usually a good idea to clean up. The Health Status symbols help to do so. Here, we found an old App Service Plan that needs to be cleaned (after any other bindings are deleted). ![]()
Check the new certificate (the next day)
In my experience, it takes some time until the new certificate is used in the website. It seems, it is updated through an Azure job in the background automatically that runs once a day. So, in my tests, the certificate update was visible the next day. When refreshing the page then, we should see the new, updated certificate, as here.
Benefits of using Key Vault with App Services
To sum up, there are a bunch of benefits when using Key Vault to manage SSL certificates for one website or for multiple websites:
- The certificate is stored in a secure and central location which allows a simplified management
- The certificate can be easily renewed in this central location and the certificate rotation works by simply creating a new certificate version
- Only permitted apps have a controlled access (We can specify permissions such as Get, List, Update, Create, Import, Delete, Recover, Backup, and Restore)
- If the certificate is used in an App Service Plan for multiple websites, the update is done automatically for all websites that have an existing binding to the updated certificate
- This is a no-code solution, simply to configure in the Azure portal
So, a lot of reasons to use that mechanism and highly recommended. ![]()
More resources
Find more resources about Azure Key Vault, and App Services here:
- What is Azure Key Vault?
- Grant your app access to Key Vault
- SSL termination with Key Vault certificates
- Add an SSL certificate in Azure App Service
- Renew certificate
- Set up Azure Key Vault with key rotation and auditing
- Generating a CSR on Windows using OpenSSL
- Deploying Azure Web App Certificate through Key Vault
- Secure your Custom Domains at no cost with App Service Managed Certificates (preview)
We hope this instruction help to secure your own websites with custom SSL certificates and Azure Key Vault!
